Vue3简介 💭
2020年9月18日,Vue.js发布3.0版本,代号:One Piece(海贼王)
github上的tags地址:https://github.com/vuejs/vue-next/releases/tag/v3.0.0
Vue3新特性
Performance
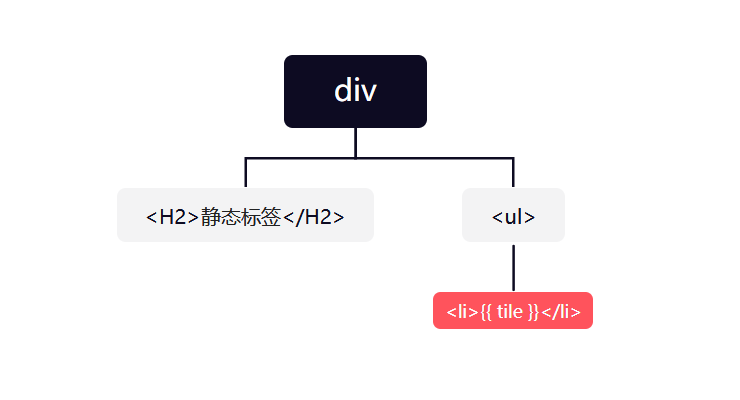
说明
在vue2中,DOM Diff过程中【虚拟DOM转换为真实DOM】,如果视图更新(比如新增了一个节点),会全部进行对比,包括静态的dom节点。而在vue3中会跳过静态节点。
- update性能提高1.3~2倍
- SSR速度提高了2~3倍
Tree shaking
- 打包时,可以将无用模块“剪辑”,仅打包需要的。
Proxy
- Proxy 参考链接: MDN Proxy 直达
- 响应式原理不再基于 Object.defineProperty
Vue2 中的数据劫持
实现原理:Vue2是基于Object.defineProperty实现数据劫持的(get/set)
需要给对象中的每一个属性分别遍历做劫持,对于后期新增的属性是没有做劫持的,vue2中可以基于
$set实现新增属性的劫持。数组类型:对于数组中的每一项没有做劫持,vue2中重写了数组7个方法,后期通过这7个方法修改数组中的某一项,才会让视图重新渲染。
前置知识点:
forEach 特性:
- 优先遍历数字属性
- 无法遍历Symbol类型的私有属性
- 会把私有以及公有中所有可枚举的都遍历「性能比较差」
获取对象中所有属性-包括私有属性
- ES5 写法
  /* 拿到obj的所有非 Symbol类型属性 */
    let keys = Object.keys(obj);

/*  拿到obj中所有 Symbol 类型的属性,返回一个数组,
    包含所有 Symbol 类型的属性名,拼接到 keys 中  */

  if (typeof Symbol !== "undefined")
  keys = keys.concat(Object.getOwnPropertySymbols(obj));
- ES6 写法
// 使用ES6语法获取所有属性包括私有属性
let keys = Reflect.ownKeys(obj);
检查是否为纯对象
const isPlainObject = function isPlainObject (obj) {
 let proto, Ctor;
 if (!obj || Object.prototype.toString.call(obj) !== "[object Object]") return false;
 proto = Object.getPrototypeOf(obj);
 if (!proto) return true;
 Ctor = proto.hasOwnProperty('constructor') && proto.constructor;
 return typeof Ctor === "function" && Ctor === Object;
};
vue2 中的数据劫持方法
 #region
let obj = {
  x: 1,
  y: { n: 2,m: 3 },
  z: [ 10, 20, 30 ]
};

const observe = function observe (obj) {
  let proxyObj = JSON.parse(JSON.stringify(obj)); // 对象深拷贝

  // 因为 forEach 特性,使用 Reflect拿到所有属性名
  let keys = Reflect.ownKeys(obj);
  // 1. 遍历所有属性名,使用Object.defineProperty劫持数据
  keys.forEach(key => {
    Object.defineProperty(obj, key, {
      get () {
        return proxyObj[key];
      },
      set (value) {
        if (proxyObj[key] === value) return;
        proxyObj[key] = value;
        // 通知视图渲染
      }
    });
    // 2. 如果属性值是对象,则继续劫持,递归调用observe
    let value = obj[key];
    if (isPlainObject(value)) {
      observe(value);
    }
  });
  return proxyObj;   // 操作obj的时候,返回的是代理对象
};
observe(obj);
obj.name = '张三';
/* 在后续更改对象时: 发现 obj.name没有被劫持,这也是vue2中的痛点
当然:vue提供了$set方法,可以解决这个问题 */
#endregion
VS Code使用 #region 折叠代码防止莫名其妙展开 :VS Code使用 #region
* 存在问题:
- 新增属性、删除属性, 界面不会更新。
- 直接通过下标修改数组, 界面不会自动更新。
Vue3 中的数据劫持
实现原理:
- 通过Proxy(代理): 拦截对象中任意属性的变化, 包括:属性值的增、删、改、查。
- 通过Reflect(反射): 对源对象的属性进行操作。
  let obj = {
    x: 1,
    y: { n: 2,m: 3 },
    z: [ 10, 20, 30 ]
  };
let proxyObj = new Proxy(obj, {
  /*
    @param target: 被代理的对象
    @param key:    是被代理的属性名
    @param value:  是被代理的属性值
  */
  get(target, key) { // 获取值
    return Reflect.get(target, key);
  },
  set(target, key, value) { // 设置值
    if (Reflect.get(target, key) === value) return;
    Reflect.set(target, key, value);
    console.log('视图更新...');   // 通知视图渲染
  },
  deleteProperty(target, key) {
    Reflect.deleteProperty(target, key);
  }
})
proxyObj.name = '张三';   // 会触发视图更新
Vue3 中的响应式数据,是基于ES6中的 Proxy 实现的
Proxy除了提供get/set监听器之外,还提供了其它大量的监听函数,当我们操作对象的时候,可以做到全方位劫持监听。 对数组的处理也很友好。Proxy无需自己依次遍历对象的每个属性,只需要代理整个对象,则所有属性都做代理了,哪怕是后期自己新增的属性也会做代理。Proxy默认也只是对对象中第一层做代理,而vue3中基于递归的方式,也实现了深层次代理。ES6的API,不兼容IE。
新的内置组件
1. Fragment 碎片化节点
TIP
- 在Vue3中: 不再限于模板中的单个根节点, 组件可以没有根标签。
- 内部会将多个标签包含在一个
<Fragment />虚拟元素中,类似于React中的<> </>, 可以有效减少标签层级, 减小内存占用。
<template>
  <div>
    <header>
      <button @click="Login">
        登入
      </button>
    </header>
    <main />
  </div>
</template>
vue3中可以有多个根节点:
<template>
  <header>
    <button @click="Login">
      登入
    </button>
  </header>
  <main />
</template>
2. <Teleport /> 传送门
TIP
<Teleport />是一种能够将我们的模板渲染至指定DOM节点,不受父级style、v-show等属性影响,但data、prop数据依旧能够共用的技术;- 类似于 React 的
<Portal> [ˈpɔːtl],译作传送门。
主要解决的问题 因为Teleport节点挂载在其他指定的DOM节点下,完全不受父级style样式影响:
两个属性:
to指定传送到哪个容器disabled传送门开关, 默认开启, 使用这个属性时一般配合响应式动态控制。
<script>
export default {
  data() {
    return {
      content: 'This is the app'
    }
  }
}
</script>

<template>
  <router-view />
  <!-- 把当前组件中的部分内容抽离出来,放置在页面非 #app的容器中,
     基于to指定放在哪个容器中 -->
  <Teleport to="#other" disabled="true">
    <h1>Other</h1>
    <h4>This is the other page</h4>
    <p> {{ content }}</p>
  </Teleport>
</template>
注意
如果设置了 <Teleport/>节, 点必须挂载在#app节点或者其他已经存在的节点下,否则会报错。
<!DOCTYPE html>
<html lang="">
  <head>
    <meta charset="utf-8">
    <meta http-equiv="X-UA-Compatible" content="IE=edge">
    <meta name="viewport" content="width=device-width,initial-scale=1.0">
    <link rel="icon" href="<%= BASE_URL %>favicon.ico">
    <title><%= htmlWebpackPlugin.options.title %></title>
  </head>
  <body>
    <div id="app"></div>
    <!-- 设置渲染容器  -->
    <div id="other"></div>
  </body>
</html>
效果如下: 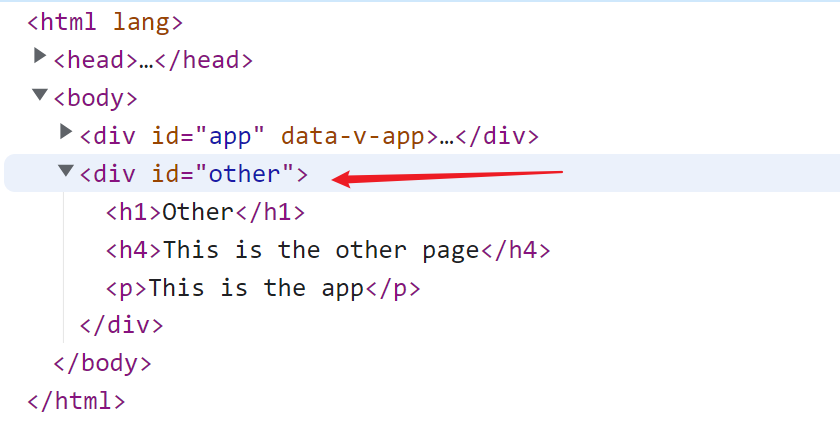
官方栗子是点击按钮的时候出现一个弹窗,但是因为弹窗和当前页面是同一级,如果我们把当前页面的颜色更改后,比如设置了当前页面透明度 opacity: 0.8;,那么弹窗的样式也会受影响,这个时候我们就可以使用传送门解决此类问题。
实例:
- 如果设置了
<Teleport/>,必须先在组件里设置节点
下面的案例中,假设页面头部有一个搜索框,我们在搜索框搜索时,希望列表组件 (兄弟组件)监听搜索框组件的值。
<script setup name="Navbar">
</script>

<template>
  <nav class="navbar navbar-light bg-white navbar-expand-lg border-bottom">
    <div class="container">
      <div class="d-flex align-items-center">
        <img class="icon me-2" src="/vite.svg" alt="">
        <a class="navbar-brand" href="#"><strong>Vue</strong> 图片上传</a>
      </div>
      <!--  搜索框传送容器    -->
      <div id="search-form" />
    </div>
  </nav>
</template>

<style lang="scss" scoped>
.icon {
  width: 24px;
  height: 24px;
}
</style>
定义搜索框组件:
<script setup>
defineProps({
  modelValue: {
    type: String
  }
})

const emits = defineEmits(['update:modelValue'])

function handleEnterKey(event) {
  emits('update:modelValue', event.target.value)
}
</script>

<template>
  <div class="mt-2 mt-md-0">
    <input :value="modelValue" class="form-control me-2" type="text" placeholder="Search in Drive" aria-label="Search" @keydown.enter="handleEnterKey">
  </div>
</template>

<style lang="scss" scoped>
</style>
在列表组件中使用:
<script setup>
import axios from 'axios'
import { reactive, watchEffect } from 'vue'
import SearchForm from '../components/SearchForm.vue'
import FileItem from '../components/FileItem.vue'

const files = ref([])

const query = reactive({
  _sort: 'name',
  _order: 'desc',
  q: ''
})

// TODO 使用watchEffect监听数据发生改变,watchEffect每次进入页面都会执行
watchEffect(async () => {
  // new URLSearchParams(query) 把对象转换为&链接的请求参数
  const { data } = await axios.get(
    `http://localhost:3030/files?${  new URLSearchParams(query)}`
  )
  files.value = data
})
</script>

<template>
  <div class="container py-3">
    <!--  请求的列表    -->
    <div class="row">
      <FileItem v-for="file in files" :key="file.id" :file="file" />
    </div>

    <!-- 使用传送门 -->
    <Teleport to="#search-form">
      <SearchForm v-model="query.q" />
    </Teleport>
  </div>
</template>

<style lang="scss" scoped>
</style>
效果: 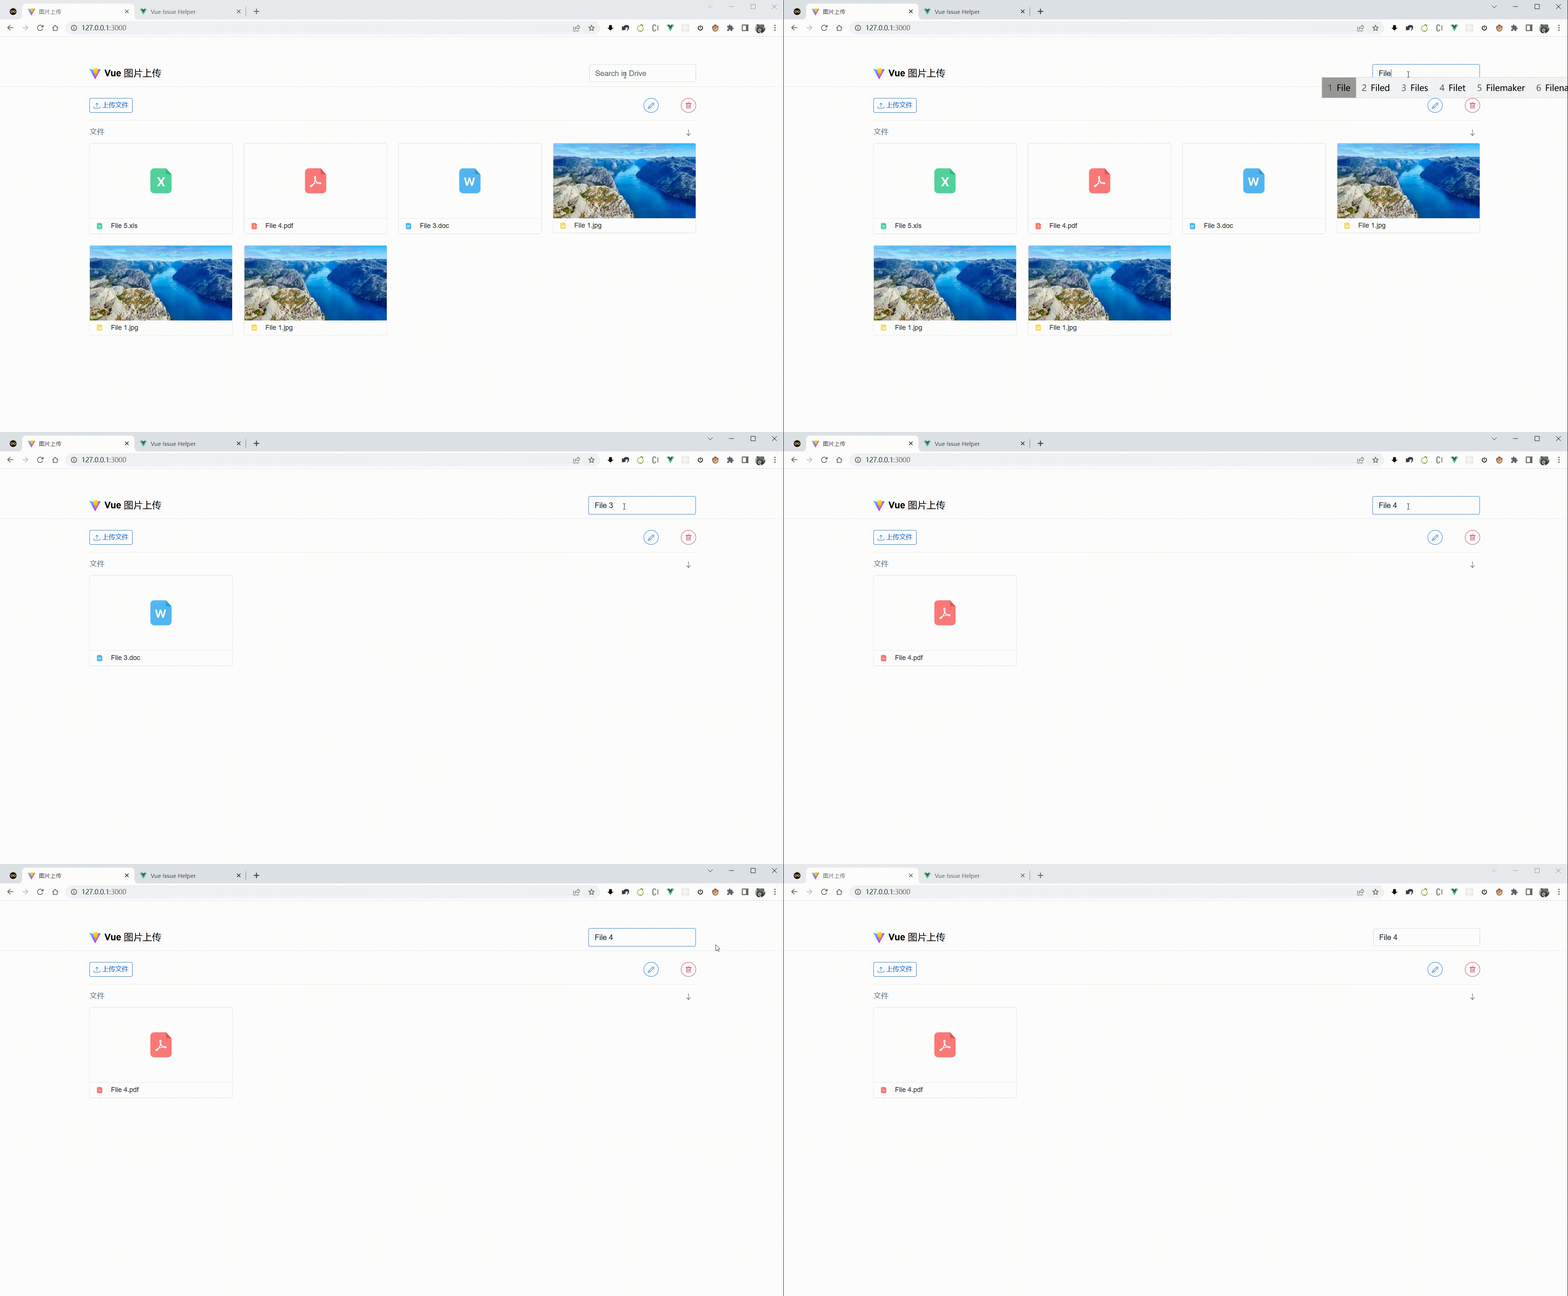
3. <Suspense /> 异步组件
WARNING
🐾 实验性功能: <Suspense> 是一项实验性功能。不能保证它会成为稳定版,而且在那之前,相关 API 也可能会发生变化。
- 可在嵌套层级中等待嵌套的异步依赖项
- 等待异步组件时渲染一些额外内容,让应用有更好的用户体验
使用:
- 定义一个 异步的子组件
asyncComponents.vue
<script setup>
function query() {
  return new Promise((resolve, reject) => {
    setTimeout(() => {
      resolve({
        data:{
          id: '1000007',
          name: 'liaoyi',
          age: 22,
          url: 'https://canxiu.oss-cn-hangzhou.aliyuncs.com/2022/user.jpg',
          desc:'Hello 2023!!'
        }
      })
    }, 2000)
  })
}
const { data } = await query()
</script>

<template>
  <h2>用户信息</h2>
  <div> ID:  {{ data.id }} </div>
  <div> 姓名:{{ data.name }} </div>
  <div> 年龄:{{ data.age }} </div>
  <div> 头像:{{ data.url }} </div>
  <div> 描述:{{ data.desc }} </div>
</template>
- 父组件中使用
TIP
<Suspense > 组件内置两个插槽,第一个插槽是 default 插槽,我们把异步组件放在里面,第二个插槽为fallback 插槽,我们可以传入异步组件没有加载成功时显示的样式。
<script>
import { defineAsyncComponent } from 'vue'
import syncVue from '@/components/asyncComponents.vue'
</script>

/* 非Setup使用 */
<script setup>
// 导入 defineAsyncComponent 用于注册异步组件
export default {
  components: { syncVue }
}
// 导入异步组件
const syncVue = defineAsyncComponent(() =>
  import('@/components/asyncComponents.vue')
)
</script>

<!-- /* Setup使用 */ -->
<template>
  <h2>使用异步组件</h2>
  <Suspense>
    <template #default>
      <syncVue />
    </template>
    <!-- 设置异步组件没有加载成功时显示的样式 -->
    <template #fallback>
      正在努力加载中...
    </template>
  </Suspense>
</template>

4. Custom Renderer API
- 自定义渲染器API
- 用户可以尝试WebGL自定义渲染器
TIP
在vue中,我们可以虚拟DOM转换为的真实DOM元素,然后以HTML网页形式展现在页面上,在vue3中,用户可以自定义渲染器,比如把虚拟DOM转换成canvas画布,以图片的形式展现在网页上。
创建Vue3 项目
官方文档:vue-cli vite官网:https://vitejs.cn
1.使用 vue-cli 创建
## 查看@vue/cli版本,确保@vue/cli版本在4.5.0以上
vue --version
## 安装或者升级你的@vue/cli
npm install -g @vue/cli
## 创建
vue create vue_test
## 启动
cd vue_test
npm run serve
2.使用 vite 创建
- 什么是vite?—— 新一代前端构建工具。
- 优势如下:
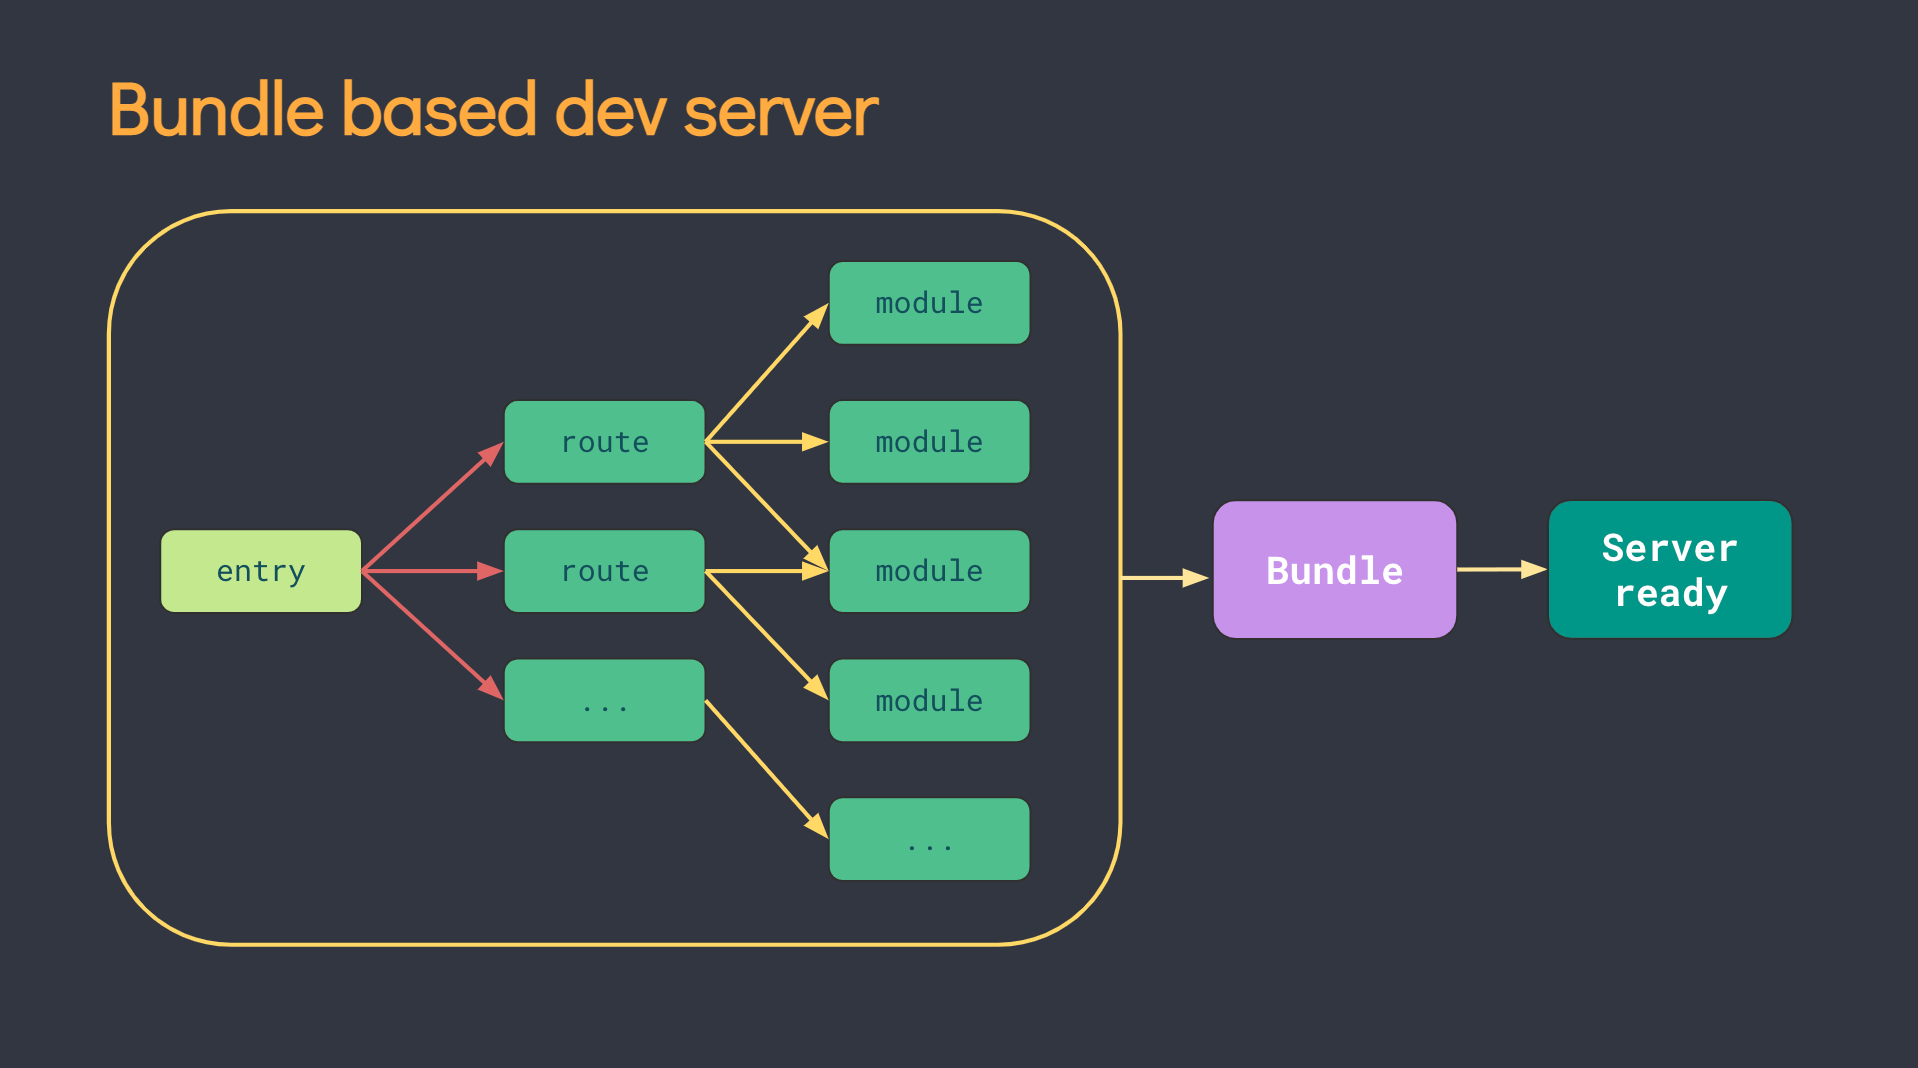
- 开发环境中,无需打包操作,可快速的冷启动。
- 轻量快速的热重载(HMR)。
- 真正的按需编译,不再等待整个应用编译完成。
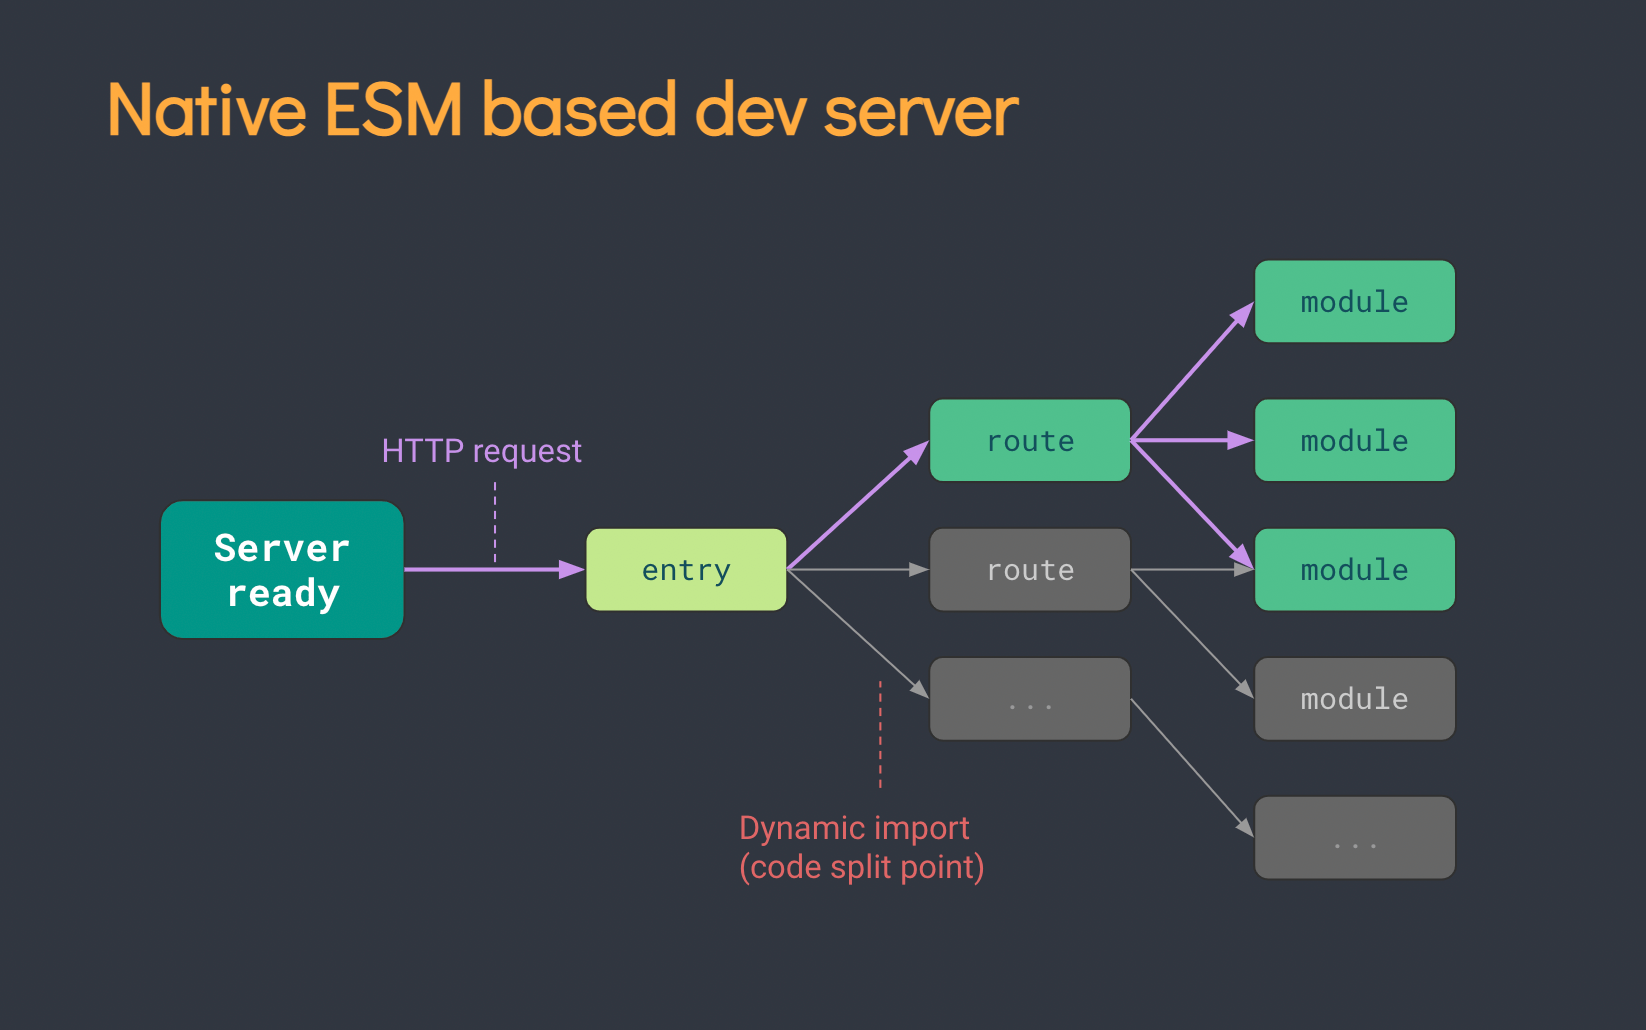
传统构建 与 vite构建对比图
## 创建工程
npm init vite-app <project-name>
## 进入工程目录
cd <project-name>
## 安装依赖
npm install
## 运行
npm run dev
setup
info
setup是Vue3.0 中一个新的配置项,值为一个函数。**setup **是所有 Composition API(组合API)“ 表演的舞台 ”。组件中所用到的:数据、方法等等,均要配置在setup中。
- 初始化时,setup 在 props和 beforeCreate 之间调用,且只在组件加载时执行。
- setup 函数可以接收 props 和 context 上下文
- this 在 setup() 中不可用
setup 两种返回值
- 🌟 若返回一个对象,则对象中的属性、方法, 在模板中均可以直接使用。(重点关注!)
<script>
export default {
  name: 'HelloWorld',
  setup() {
    const name = '张三'
    const age = 18
    function sayHello() {
      alert(`我叫${name},我${age}岁了,你好啊!`)
    }
    function test2() {
      console.log(name, age)
    }
    return { name, age, sayHello, test2 }
  }
}
</script>
- 若返回一个渲染函数:则可以自定义渲染内容。(了解)
<!-- // 注意:如果是返回一个渲染函数,那么此页面上的原有样式将会被覆盖。 -->
<script>
// 我们在vue2中的main.js中已经见过 h 渲染函数了,在vue3中使用需要导入。
import { h } from 'vue'
	export default {
    	name: 'HelloWorld',
    // 	return ()=> return {  h('h1','2022') }
		//返回一个函数(渲染函数),这个渲染函数必须把h函数调用结果 return 出去。
    // 调用 h函数的时候传入两个参数,第一个参数是dom元素,第二个参数是dom元素里的内容。
		return ()=> h('h1','你好 2022 !')
}
</script>
注意
- 尽量不要与Vue2.x配置混用
- Vue2.x配置(data、methos、computed...)中可以访问到setup中的属性、方法。
- 但在setup中不能访问到Vue2.x配置(data、methos、computed...)。
- 如果有重名, setup优先。
setup不能是一个async函数,因为返回值不再是return的对象, 而是promise, 模板看不到return对象中的属性。(后期也可以返回一个Promise实例,但需要Suspense和异步组件的配合)
- 现在的版本已经支持!
setup的两个注意点
setup执行的时机
在beforeCreate之前执行一次,this是 undefined
setup接收的参数
TIP
- props:包含:组件外部传递过来,且组件内部声明接收了的属性。
- context:上下文对象
attrs: 包含组件外部传递过来,但没有在props配置中声明的属性, 相当于this.$attrs。slots: 收到的插槽内容, 相当于this.$slotsemit: 分发自定义事件的函数, 相当于this.$emit
常用 Composition API
官方文档: https://v3.cn.vuejs.org/guide/composition-api-introduction.html
ref
ref(reference) 函数是vue3中新增的函数,常用于定义普通数据类型的响应式数据。
- 返回一个 RefImpl 对象 (ES6中的class类);
- 必须操作该对象的value值改变数据 (状态)
- 模板中读取数据: 不需要
.value,直接:<div></div> - 响应式依然是靠
Object.defineProperty()的get与set完成的 。
<script>
import { ref } from "vue";
export default {
  setup() {
   let supNum = ref(10);
   let oppNum = ref(5);

   // 如果想修改值,需要操作 value 值
   oppNum.value ++

   return { supNum,oppNum }
  }
}
</script>
TIP
对于对象类型的数据实现响应式 :内部 "求助" 了Vue3 中的一个新函数—— reactive函数。
reactive
定义一个对象或数组类型的响应式数据(基本类型不要用它,用ref函数)
- 等同于 vue2 中的
Vue.observable() - 响应式转换是 "
深层的":会影响对象内部所有嵌套的属性。
<template>
  <p>{{ state.supNum }}</p>
  <p>{{ state.oppNum }}</p>
  <p>{{ state.arr[0] }}</p>
  <button @click="change(0)">
    点击修改数据
  </button>
</template>

import { reactive } from "vue";
export default {
  setup() {
    // 比Object.defineProperty好用在于:
    // 对于数据或者并未初始化的对象成员,都可以随意修改值,而且具备响应式的效果
    // const 代理对象= reactive(源对象)
    let state = reactive({
      supNum: 0,
      oppNum: 0,
      arr: [10, 20]
    });
    let change = lx => {
      lx === 0 ? state.supNum++ : state.oppNum++;
      state.arr[0] = state.arr[0] + 1;
    };
    return {
      state,
      change
    };
  }
};
reactive 定义数组异步赋值问题
reactive 生成的是一个 proxy 代理对象,不能直接赋值,否则会丢失响应式。
我们来看一个例子: 下面代码中,如果直接这样赋值,页面是不会变化,因为会脱离响应式
<script setup lang="ts">
import { reactive } from 'vue'

let list = reactive<string[]>([])
function getData() {
  setTimeout(() => {
    list = ['钟馗', '姜子牙', '杨戬', '哪吒']
    console.log(list)
  }, 1000)
}
</script>

<template>
  <ul>
    <li v-for="(name, index) in list" :key="index">
      {{ name }}
    </li>
  </ul>
  <button @click="getData">
    获取异步数据
  </button>
</template>
解决方案:
- 使用数组方法
push
<script setup lang="ts">
import { reactive } from 'vue'

const list = reactive<string[]>([])
function getData() {
  setTimeout(() => {
    const arr =  ['钟馗', '姜子牙', '杨戬', '哪吒']
    person.push(...arr)
    console.log(list)
  }, 1000)
}
</script>
- 包裹一层对象再修改
<script setup lang="ts">
import { reactive } from 'vue'

const list = reactive<{ arr: string[] }>({ arr: [] })
function getData() {
  setTimeout(() => {
    list.arr = ['钟馗', '姜子牙', '杨戬', '哪吒']
    console.log(list)
  }, 1000)
}
</script>

<template>
  <ul>
    <li v-for="(name, index) in list.arr" :key="index">
      {{ name }}
    </li>
  </ul>
  <button @click="getData">
    获取异步数据
  </button>
</template>
reactive 丢失响应式问题 Vu3巨坑
如果你要替换整个数组还要保持响应式,要么用 ref ,要么用 splice(0) 清空数组,然后再 push(..item)。
reactive配合toRefs使用
上面的代码中使用 state.xxx 操作比较麻烦,我们应该可以想到使用解构赋值的方式 return{ ...state }导出数据, 但是,如果 直接使用解构的方式,会丢失响应式。
解决办法:可以基于 toRefs 函数,把state状态中的每一项都变为单独的 RefImpl对象。
<template>
  <p>{{ supNum }}</p>
  <p>{{ oppNum }}</p>
  <p>{{ arr[0] }}</p>
  <button @click="change(0)">
    点击修改数据
  </button>
</template>

<stript lang="ts">
import { reactive, toRefs } from "vue";
export default {
  setup() {
    let state = reactive({
      supNum: 0,
      oppNum: 0,
      arr: [10, 20]
    });
    let change = lx => {
      lx === 0 ? state.supNum++ : state.oppNum++;
      state.arr[0] = state.arr[0] + 1;
    };
    return {
      ...toRefs(state),
      change
    };
  }
};
</stript>
使用 ref 获取DOM元素
在vue3没有this,那我们如何像在vue2中通过refs来操作dom元素呢 ?
我们可以通过响应式对象的方式获取DOM元素:
<template>
   <!-- 把setup定义的ref响应对象作为dom元素上的ref属性  -->
   <h3 ref="root">{{ title }}</h3>
</template>

import { ref, onMounted } from "vue";
export default {
  setup() {
    let title = ref("你好,2022!"),
    // Vue3中获取DOM元素:把RefImpl对象作为元素的ref属性值,
    // 这样基于“RefImpl对象.value”可以获取此DOM
    let root = ref();  // 和 let root = ref(null) 等价
    onMounted(() => {
      // 获取DOM元素
      console.log(root.value);
    });
    return {
      title,
      root
    };
  }
}
<script setup lang="ts">
  import { ref, onMounted } from "vue"

  let title = ref("你好,2022!")

  // Vue3中获取DOM元素:把RefImpl对象作为元素的ref属性值,
  // 这样基于“RefImpl对象.value”可以获取此DOM
  let root = ref<HTMLDivElement>()

  onMounted(() => {
    // 获取DOM元素
    console.log(root.value?.innerText);
  })

<template>
  // <!-- 把setup定义的ref响应对象作为dom元素上的ref属性  -->
  <h3 ref="root"> {{ title }} </h3>
</template>
计算属性和监听器
computed
传入一个 getter 函数,返回一个默认不可手动修改的 ref 对象。计算属性只有当依赖的属性的值发生变化的时候,才会触发他的更改,如果依赖的值不发生变化,使用的是缓存中的属性值。
在vue2中的计算属性我们是可以直接修改值的,但是vue3中如果不适应setup语法糖,如果你尝试那么做,控制台会报错:
<script>
import { computed, ref } from 'vue'

export default {
  setup() {
    const count = ref(1)
    const plusOne = computed(() => count.value + 1)
    console.log(plusOne.value) //2

    // 这样获取的计算属性值是只读的,当我们尝试去修改的时候,
    // 报警告:computed value is readonly
    plusOne.value++ //错误!

    return { count, plusOne }
  }
}
</script>
函数形式
import { computed, reactive, ref } from 'vue'
let price = ref(0)//$0

let m = computed<string>(()=>{
   return `$` + price.value
})

price.value = 500
对象形式
传入一个拥有 get 和 set 函数的对象,创建一个可手动修改的计算状态,写法如下:
<script setup lang="ts">
import { computed, reactive, ref } from 'vue'

const price = ref<number | string>(1) //$0

const state = reactive({
  	supNum: 12,
  	oppNum: 11
})

const mul = computed({
  get: () => {
    return price.value
  },
  set: (value) => {
    price.value = `set${  value}`
  }
})

mul.value = 666
console.log(mul.value) // set666

const ratio = computed({
  get: () => {
    const total = state.supNum + state.oppNum
    return total === 0
      ? '--'
      : `${((state.supNum / total) * 100).toFixed(2)  }%`
  }
})
</script>

<template>
  <div>{{ mul }}</div>
  <div @click="mul = 100">
    click
  </div>
</template>
小案例: 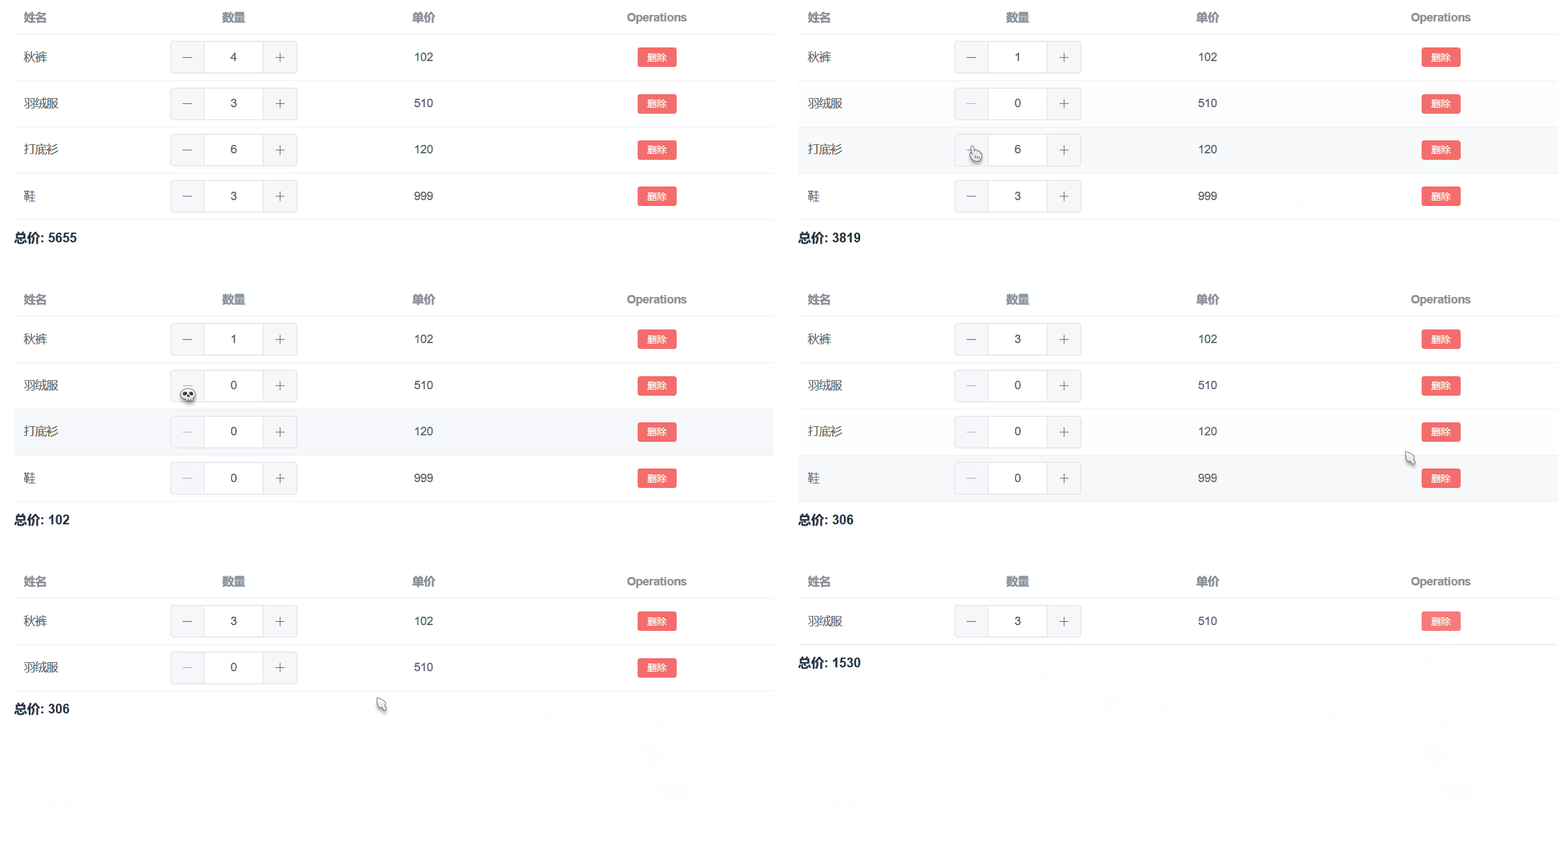
代码实现:
<script setup lang="ts">
import { computed, reactive, ref } from 'vue'

interface Shop {
  name: string
  num: number
  price: number
}
const $total = ref<number>(0)
const data = reactive<Shop[]>([
  {
    name: '秋裤',
    num: 4,
    price: 102
  },
  {
    name: '羽绒服',
    num: 3,
    price: 510
  },
  {
    name: '打底衫',
    num: 6,
    price: 120
  },
  {
    name: '鞋',
    num: 3,
    price: 999
  }
])


$total.value = computed<number>(() => {
  return data.reduce((prev, next) => {
    return prev + (next.num * next.price)
  }, 0)
})

function handleDelete(index: number): void {
  data.splice(index, 1)
}
</script>

<template>
  <el-table :data="data" style="width: 100%">
    <el-table-column prop="name" label="姓名" width="180" />

    <el-table-column label="数量" width="180" align="center">
      <template #default="scope">
        <div style="display: flex; align-items: center">
          <el-input-number v-model="scope.row.num" :step="1" size="large" :min="0" />
        </div>
      </template>
    </el-table-column>

    <el-table-column prop="price" label="单价" align="center" />
    <el-table-column label="Operations" align="center">
      <template #default="scope">
        <el-button size="small" type="danger" @click="handleDelete(scope.$index)">
          删除
        </el-button>
      </template>
    </el-table-column>
  </el-table>
  <div style="display: flex; align-items: flex-end; padding-top: 10px; font-weight: bold">
    总价: {{ $total }}
  </div>
</template>
watch
与Vue2.x中watch配置功能一致 :侦听特定的数据源,并在单独的回调函数中执行副作用。
两个小“坑”:
- 监视reactive定义的响应式数据时:
oldValue无法正确获取、强制开启了深度监视(deep配置失效)。 - 监视
reactive定义的响应式数据中某个属性时:deep配置有效。
//情况一:监视ref定义的响应式数据
watch(sum,(newValue,oldValue)=>{
	console.log('sum变化了',newValue,oldValue)
},{immediate:true})

//情况二:监视多个ref定义的响应式数据
watch([sum,msg],(newValue,oldValue)=>{
	console.log('sum或msg变化了',newValue,oldValue)
})

/* 情况三:监视reactive定义的响应式数据
			若watch监视的是reactive定义的响应式数据,则无法正确获得oldValue!!
			若watch监视的是reactive定义的响应式数据,则默认强制开启了深度监视
*/
watch(person,(newValue,oldValue)=>{
	console.log('person变化了',newValue,oldValue)
},{immediate:true,deep:false}) //此处的deep配置不再奏效

//情况四:监视reactive定义的响应式数据中的某个属性
watch(()=>person.job,(newValue,oldValue)=>{
	console.log('person的job变化了',newValue,oldValue)
},{immediate:true,deep:true})

//情况五:监视reactive定义的响应式数据中的某些属性
watch([()=>person.job,()=>person.name],(newValue,oldValue)=>{
	console.log('person的job变化了',newValue,oldValue)
},{immediate:true,deep:true})

//特殊情况
watch(()=>person.job,(newValue,oldValue)=>{
    console.log('person的job变化了',newValue,oldValue)
},{deep:true}) //此处由于监视的是reactive素定义的对象中的某个属性,所以deep配置有效
注意: ref创建的状态直接监听 reactive创建的某个状态要写成函数。
监听路由
/* 监听路由变化,切换子路由页面时保持tab选中状态 */
watch(
  () => router.currentRoute.value.path,
  (newValue: string) => {
    activeName.value = newValue.split('/')[2]
  },
  { immediate: true }
)
watch 的参数
import { ref, watch } from 'vue'

const message = ref({
  nav:{ bar:{  name:'' } }
})

/* watch 的参数:
 	* 第一个参数:监听源
  * 第二个参数回调函数cb(newVal,oldVal)
  * 第三个参数一个options配置项是一个对象
    {
   		 immediate:true //是否立即调用一次
    	 deep:true //是否开启深度监听
       flush:'pre' // 用于设置watch的执行顺序 (watch基本用不上)
       // pre: 组件更新前调用,sync: 同步调用, post: 组件更新后执行
    }
 */
watch(message, (newVal, oldVal) => {
  // 如果监听的是引用数据类型,那返回的新值和旧值都一样
  console.log('新的值----', newVal)
  console.log('旧的值----', oldVal)
}, {
  immediate:true,
  deep:true
})
监听多个ref
注意:监听多个ref时应该传入一个数组:
import { reactive, ref, watch } from 'vue'

const message = ref('')
const message2 = ref('')

watch([message, message2], (newVal, oldVal) => {
  console.log('新的值----', newVal)
  console.log('旧的值----', oldVal)
})
监听reactive
使用reactive监听深层对象开启和不开启 deep 效果一样 (deep失效)
import { reactive, ref, watch } from 'vue'

const message = reactive({
  nav:{ bar:{ name:'' } }
})

watch(message, (newVal, oldVal) => {
  console.log('新的值----', newVal)
  console.log('旧的值----', oldVal)
})
监听单个值时有效:
注意:
如果要监听单一属性,我们需要使用一个get函数返回我们需要监听的属性值
import { ref, watch ,reactive} from 'vue'

let message = reactive({
    name:'',
  	foo:{
      bar:{
        name: 'liaoyi',
        age: 22
      }
    }
})

watch(()=>message.foo.bar.name, (newVal, oldVal) => {
    console.log('新的值----', newVal)
    console.log('旧的值----', oldVal)
})
watchEffect
立即执行传入的一个函数,并响应式追踪其依赖,并在其依赖变更时重新运行该函数
<script setup lang="ts">
// 第一次加载组件,会触发watchEffect回调
// watchEffect所指定的回调中用到的数据只要发生变化,就会触发callback执行
// 类似于周期函数中的 mounted和updated「只不过只有更改了依赖的状态才会在更新后执行」

const message = ref<string>('hello')
const message2 = ref<string>('2023')

// 用到几个响应式数据就会监听几个,且是非惰性 会默认调用一次(立即调用)
watchEffect(() => {
  console.log('watchEffect配置的回调执行了', message.value,)
  console.log('watchEffect配置的回调执行了', message2.value)
})
</script>

<template>
  <input v-model="message" type="text">
  <input v-model="message2" type="text">
</template>
清除副作用
可以在触发监听之前会调用一个函数可以处理你的逻辑,例如防抖。
import { ref, watchEffect } from 'vue'

const message = ref<string>('hello')
const message2 = ref<string>('2023')

watchEffect((oninvalidate) => {
  console.log('message', message.value)
  console.log('message2', message2.value)
  // 回调函数会先执行
  oninvalidate(()=>{
    console.log('before')
  })
})
停止监听
我们可以手动停止停止 watchEffect 监听,跟踪 watchEffect 返回一个函数, 调用之后将停止更新。
<script setup lang="ts">
const message = ref<string>('hello')
const message2 = ref<string>('2023')

const stop = watchEffect((oninvalidate) => {
  console.log('message', message.value)
  console.log('message2', message2.value)
  oninvalidate(()=>{
    console.log('before')
  })
})
const stopWatch = () => stop()
</script>

<template>
  <input v-model="message" type="text">
  <input v-model="message2" type="text">
  <button @click="stopWatch">
    停止监听<button />
  </button>
</template>
其它的一些配置项
副作用刷新时机 flush配置, 一般使用post
| pre | sync | post |
|---|---|---|
| 组件更新前执行 | 强制效果始终同步触发 | 组件更新后执行 |
// onTrigger是vue给我们在开发环境时提供的debugger函数  可以帮助我们调试 watchEffect
import { ref, watchEffect } from 'vue'

const message = ref<string>('')
watchEffect((oninvalidate) => {
  console.log('message2', message.value)
}, {
  flush:'post',
  onTrigger() {
    debugger
  }
})
watch 和 watchEffect 总结:
- watch 的套路:
- 既要指明监视的属性,也要指明监视的回调。
- watchEffect 的套路:
- 不用指明监视哪个属性,监视的回调中用到哪个属性,那就监视哪个属性。
- watchEffect 有点像
computed,但computed注重的计算出来的值(回调函数的返回值),所以必须要写返回值;而watchEffect更注重的是过程(回调函数的函数体),所以不用写返回值。
生命周期
简单来说就是一个组件从创建到销毁的过程,称为生命周期。
vue2.x的生命周期
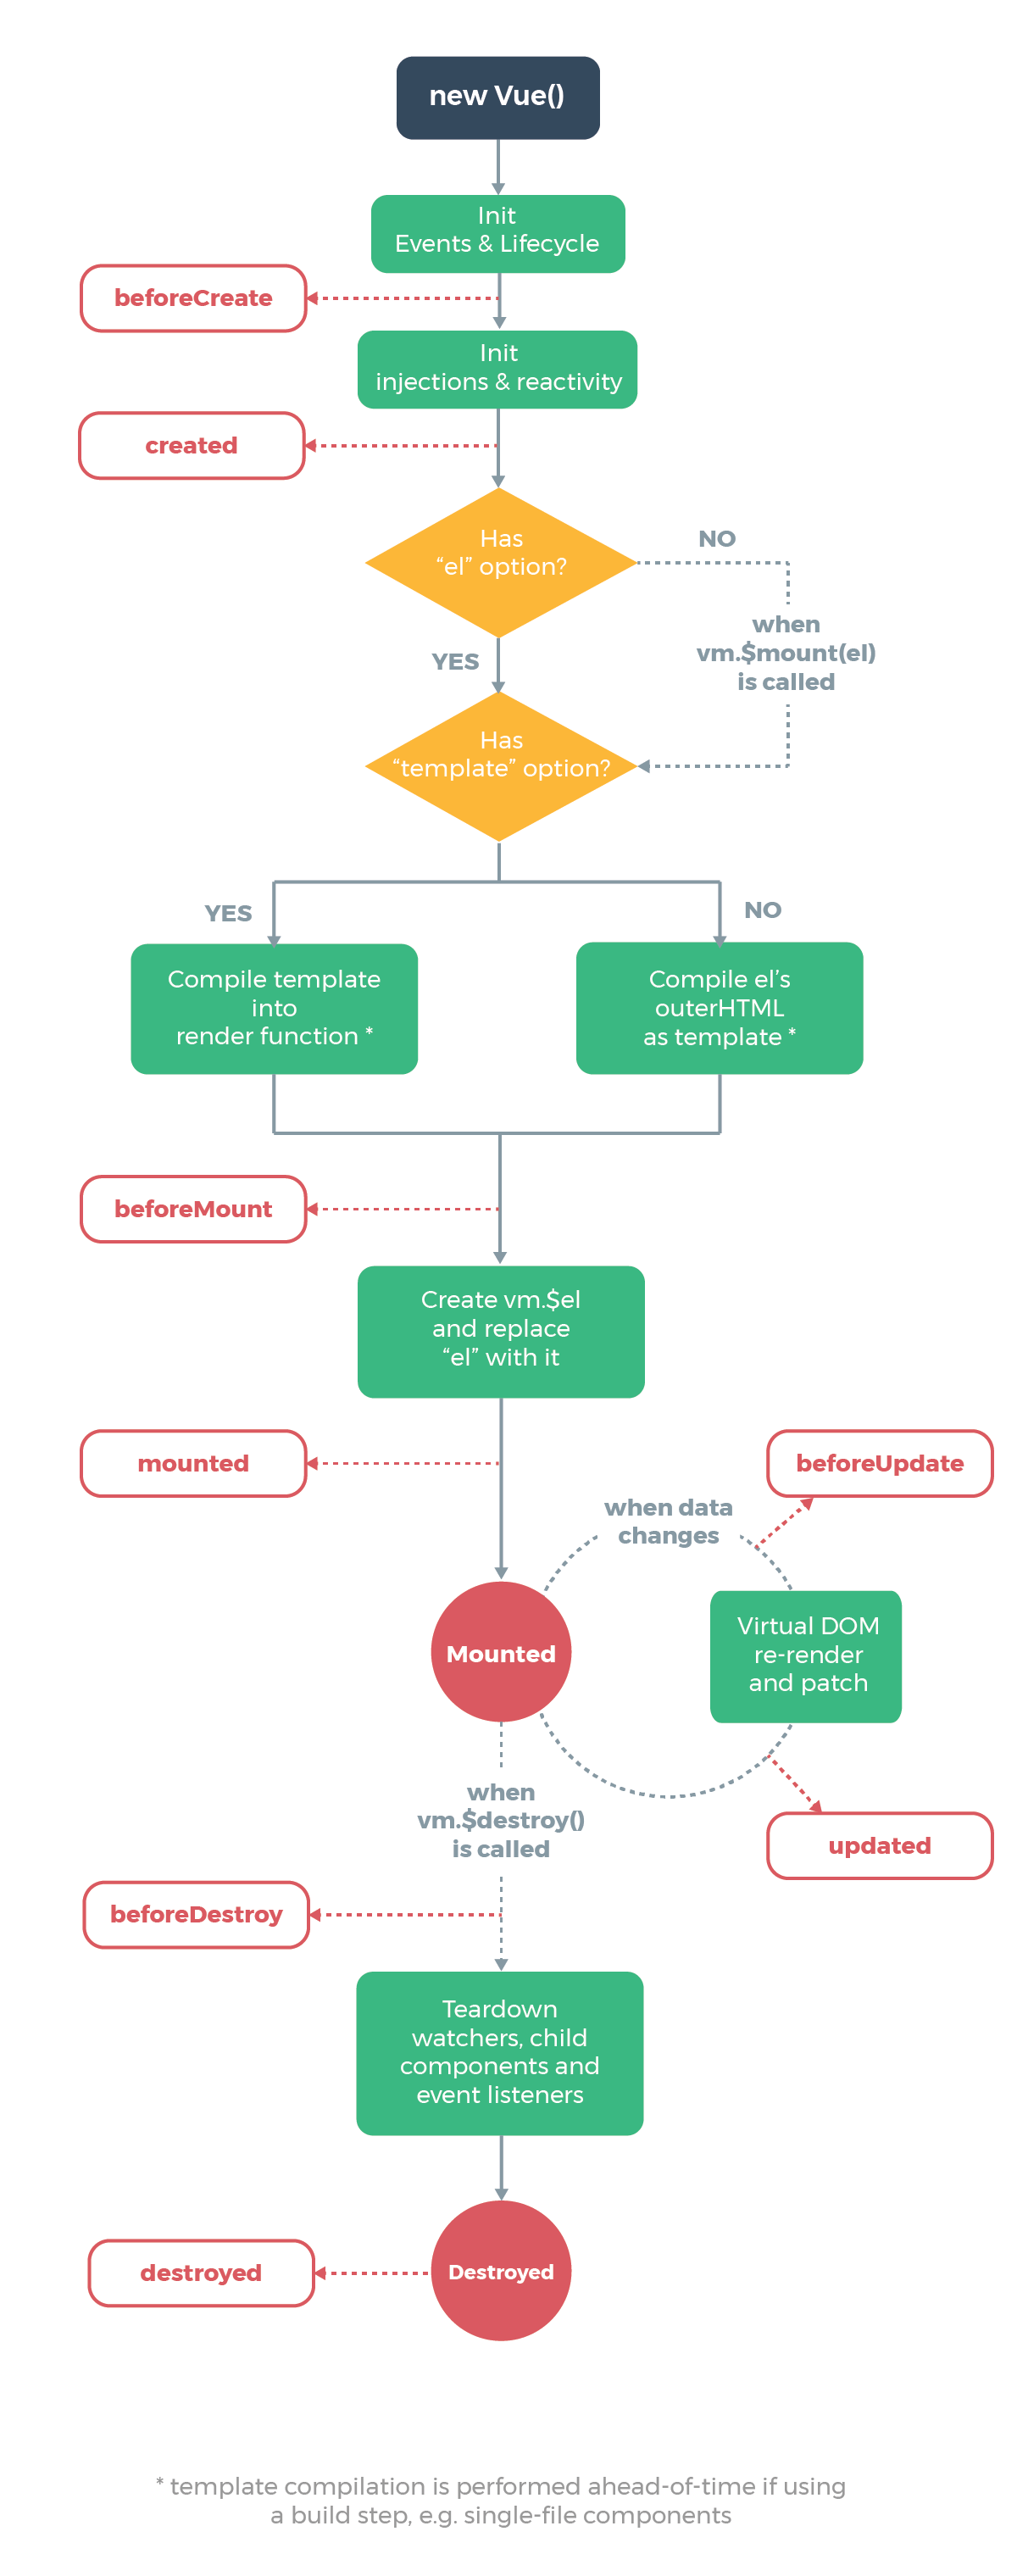
vue3 的生命周期
生命周期钩子
Vue3.0中可以继续使用Vue2.x中的生命周期钩子,但有两个被更名:
beforeDestroy改名为beforeUnmountdestroyed改名为unmounted
Vue3.0也提供了 Composition API 形式的生命周期钩子,与Vue2.x中钩子对应关系如下:beforeCreate===> setup() 根元素还不存在( 啥也没有) created=======> setup() 有数据但没有 DOM beforeMount ===> onBeforeMount 有数据但没有 DOM mounted=======> onMounted 有数据也有 DOM beforeUpdate===> onBeforeUpdateupdated =======> onUpdatedbeforeUnmount ==> onBeforeUnmountunmounted =====> onUnmounted
注意:在我们使用Vue3 组合式API时,是没有 beforeCreate 和 created 这两个生命周期的 。
| 选项式API | Hook inside setup | 说明 |
|---|---|---|
| beforeCreate | Not needed* | |
| created | Not needed* | |
| beforeMount | onBeforeMount | 组件创建之前,无法获取dom |
| mounted | onMounted | 创建完成,可以获取dom |
| beforeUpdate | onBeforeUpdate | 更新前,获取的是更新前dom |
| updated | onUpdated | 更新完成,获取的是更新后的dom |
| beforeUnmount | onBeforeUnmount | 组件销毁之前 |
| unmounted | onUnmounted | 组件销毁完成 |
| errorCaptured | onErrorCaptured | |
| renderTracked | onRenderTracked | |
| renderTriggered | onRenderTriggered | 接收一个target,用于调试 |
| activated | onActivated | |
| deactivated | onDeactivated |
组件通讯
defineProps 父传子
💭
父组件通过 v-bind 绑定一个数据,子组件通过defineProps接收, 且无须引入,可以在模板直接使用。
父组件:
<script setup>
import { reactive } from 'vue'

const list = reactive(['子鼠', '丑牛', '寅虎', '卯兔'])
const item = reactive({ name: 'liaoyi', phone: '13245666776' })
</script>

<template>
  <Children title="我是标题" :list="list" :item="item" />
</template>
子组件:
<script setup>
// defineProps无需 import 导入
defineProps({
  title:{
    type: String,
    default: 'Hello 2023!'
  },
  list: {
    type: Array,
    required: true  // 设置为必传
  },
  item:{
    type: Object,
    default: () => {}
  }
})
</script>

<template>
  <div> {{ title }} </div>
  <div v-for="(item, index) in list" :key="index">
    {{ item }}
  </div>
  <div> 姓名:{{ item.name }} 电话: {{ item.phone }}</div>
</template>
💭
如果我们在 script 标签中想使用 props ,需要用一个变量接收。即使我们用常量接收了 `props,我们在模板中还是可以直接使用,不需 {{props.item}}
<script setup>
const props = defineProps({
  title: {
    type: String,
    default: 'Hello 2023!'
  },
  list: {
    type: Array,
    required: true // 设置为必传
  },
  item: {
    type: Object,
    default: () => {}
  }
})
// 使用 props
console.log('props', props.item)
</script>
在ts中使用
如果你使用 ts ,我们可以使用传递字面量类型的纯类型语法做为参数的方式接收props:
<script setup lang="ts">
defineProps<{
  	title: string
  	list: number[]
  item: object
}>()
</script>


<template>
  <div> {{ title }} </div>
  <div v-for="(item, index) in list" :key="index">
    {{ item }}
  </div>
  <div> 姓名:{{ item.name }} 电话: {{ item.phone }}</div>
</template>
上面的写法,无法约束props的默认值,我们可以使用 TS 特有的默认值方式:
💭
withDefaults( ) 函数也是无须引入开箱即用接收一个 defineProps 函数,第二个参数是给一个对象,我们可以设置不同props的默认值。
<script setup lang="ts">
interface Item {
  name?: string
  phone?: string
}

// 采用ts专有声明,有默认值
/* interface Props {
  		title: string;
  		list?: string[];
  		item: Item;
} */

interface Props {
  title: string
  list?: string[]
  item: Item
}

withDefaults(defineProps<Props>(), {
  title: '张三',
  list: () => []
})
</script>

<template>
  <div>{{ title }}</div>
  <div v-for="(item, index) in list" :key="index">
    {{ item }}
  </div>
  <div>姓名:{{ item.name }} 电话: {{ item.phone }}</div>
</template>
<!-- 父组件  -->
<Children :paging="paging" />

<script setup lang="ts">
const paging = reactive({
  		limit: 101,
  		total: 999
})
</script>


// 子组件
<script setup lang="ts">
interface IPagenation {
  limit: number
  total: number
  page?: number
  pagesizes?: Array<number>
  background?: boolean
  layout?: any
  autoScroll?: boolean
}

const props = withDefaults(
  defineProps<{
    paging: IPagenation
  }>(),
  {
    paging: (): IPagenation => {
      return {
        limit: 1,
        total: 9
      }
    }
  }
)
</script>

<template>
  <div>{{ paging.limit }} -- {{ paging.total }} </div>
</template>
defineEmits 子向父事件传递
<script setup lang="ts">
import { reactive } from 'vue'

/* 非ts */
// const emit = defineEmits(['on-click'])

/* ts专有 */
const emit = defineEmits<{
  (e: 'on-click', list: number[]): void
  // (e: 'ochange', name: string ): void; 多个写法
}>()

const list = reactive<number[]>([4, 5, 6])

function clickThis() {
  emit('on-click', list)
}
</script>

<template>
  <button @click="clickThis">
    点我给父组件传值
  </button>
</template>
父组件接收自定义事件:
<script setup lang="ts">
function getList(list: number[]) {
  console.log('父组件接受子组件数据', list)
}
</script>

<template>
  <children @on-click="getList" />
</template>
defineExpose 子向父暴露属性
💭
在使用vue2开发时,我们经常使用 ref 来获取子组件的数据、方法等,但在vue3 中setup语法糖模式时,会返回 {_v_skin:true} 这个信息,表示数据无法响应,这个时候我们需要使用 defineExpose 来暴露当前组件的一些属性、方法。点击查看 vue3 definEexpose。
子组件暴露方法和属性:
<script setup lang="ts">
import { reactive, ref } from 'vue'

const list = reactive<number[]>([4, 5, 6])
const title = ref('Hello 2023!!!')

function handleNodeClick() {
  console.log('我是暴露的方法~~')
}

// 将属性、方法暴露出去
defineExpose({
  list,
  title,
  name: 'liaoyi',
  handleNodeClick,
  open: ()=>{
    console.log('~~~~~')
  }
})
</script>

<template>
  <div>  我是子组件  </div>
</template>
我们从父组件获取子组件实例通过ref
<script setup lang="ts">
// ts写法 --这样获取是有代码提示的
// 使用ts自带的工具 InstanceType,它接收一个泛型,我们再通过 typeof 读取 childRef 的类型
const childRef = ref<InstanceType<typeof childRef>>()

/* 非ts */
// const childRef = ref()

function handleClick() {
  console.log(childRef.value)
  childRef.value.handleNodeClick()
}
</script>

<template>
  <children ref="childRef" @on-click="getList" />
  <button @click="handleClick">
    获取children组件暴露参数
  </button>
</template>
// 子组件 tree
const handleNodeClick = () => {
 console.log('要执行的方法')
}
//将方法暴露出
defineExpose({ handleNodeClick})


// 父组件  通过ref
<tree :show="show"  ref="treeRef"> </tree>
const treeRef = ref()
provide 、inject 依赖注入
💭
依赖注入用于实现祖与后代组件间通信 ,父组件有一个 provide 选项来提供数据,后代组件有一个 inject 选项来接收使用这些数据 。
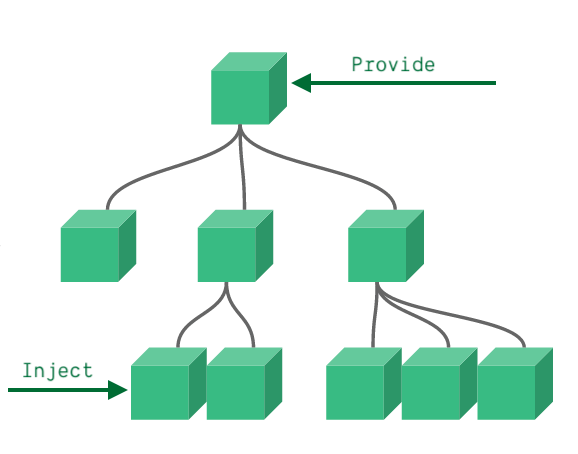
具体写法
let car = reactive({name:'奔驰',price:'40万'})
// 传递响应式数据
provide('car',car)
const car = inject('car')
实例:
<script setup lang="ts">
import { provide, readonly, ref } from 'vue'

const colorVal = ref<string>('red')
// provide 默认是可以让子组件修改的
provide('color', colorVal)
// 如果不想要被修改
provide('bg', readonly(colorVal))
</script>

<template>
  <el-card class="box-card">
    <template #header>
      <div class="card-header">
        <span>provide、inject 依赖注入</span>
      </div>
    </template>
    <div>
      <label>
        <input v-model="colorVal" value="red" type="radio" name="color">
        红色
      </label>
      <label>
        <input v-model="colorVal" value="green" type="radio" name="color">
        绿色
      </label>
      <label>
        <input v-model="colorVal" value="blue" type="radio" name="color">
        蓝色
      </label>
      <label>
        <input v-model="colorVal" value="orange" type="radio" name="color">
        橙色
      </label>
    </div>

    <div class="box" />


    <ProvideA />
  </el-card>
</template>

<style>
.box-card {
  margin-top: 30px;
}
.box {
  margin-top: 10px;
  width: 80px;
  height: 80px;
  /* vue3新增语法糖,css可以使用v-band() 变量动态绑定 */
  background-color: v-bind(colorVal);
}
</style>
<script setup lang="ts">
import { inject } from 'vue'

// 直接使用 inject 会提unknown类型,因为我们传入的是ref类型的string,我们在这里传入泛型
import type { Ref } from 'vue'

const color = inject<Ref<string>>('color')
</script>

<template>
  <h3>provideA.vue (儿子级别组件)</h3>
  <div class="box" />
  <ProvideB />
</template>
<script setup lang="ts">
import { inject } from 'vue'
import type { Ref } from 'vue'

const color = inject<Ref<string>>('color')
const bg = inject<Ref<string>>('bg')

function change() {
  // 可选链操作符无法赋值,因为返回的类型可能是 Ref<string> 或者 undefined
  // 解决方式有两种
  // 1. 使用非空断言
  color!.value = 'pink'
}

function changeBg() {
  bg!.value = 'blue'
}

// 2. 传入默认值的方式
// const color = inject<Ref<string>>('color',ref('red'));
</script>

<template>
  <h3>provideB.vue (孙子级别组件)</h3>
  <div style="margin-bottom: 20px">
    <el-button @click="change">
      修改provide为 pink
    </el-button>
    <el-button @click="changeBg">
      修改provide值 - (!设置了 readonly)
    </el-button>
  </div>
  <div class="box" />
</template>
效果: 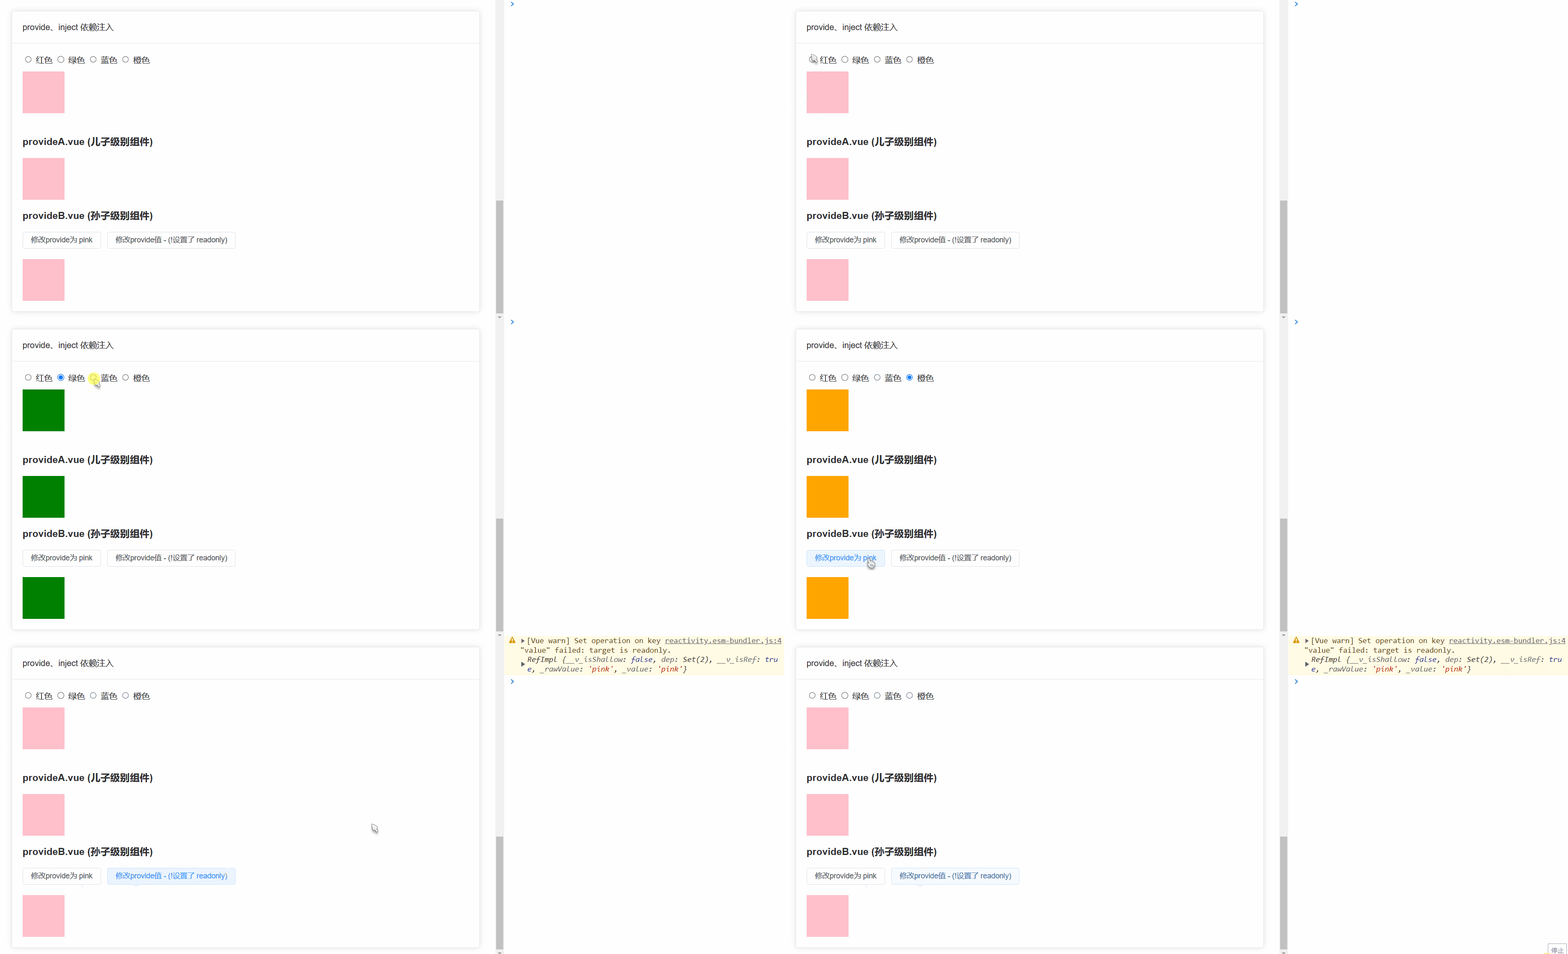
globalProperties 全局属性
const app = createApp(App);
app.config.globalProperties.$user = {
    name: '梅长苏',
    weapons: '长剑',
    title: '刺客'
}

<p>姓名:{{$user.name}} </p>

const { proxy } = getCurrentInstance()
console.log(proxy.$user)
getCurrentInstance 获取组件实例
获取当前组件实例
const { proxy } = getCurrentInstance()
console.log(proxy.$user)
动态组件
动态组件就是:让多个组件使用同一个挂载点,并动态切换。
vue2 写法
<script>
import A from './z-a.vue'
import B from './z-b.vue'
import C from './z-c.vue'

export default {
  components: { A, B, C },
  data() {
    return {
      componentId: 'A', // 默认显示的组件
      tabList: [
        { name: 'A组件', com: 'A' },
        { name: 'B组件', com: 'B' },
        { name: 'C组件', com: 'C' }
      ]
    }
  },
  methods: {
    changeTab(item) {
      this.componentId = item.com
    }
  }
}
</script>

<template>
  <div>
    <div style="display: flex">
      <div
        v-for="(item, index) in tabList" :key="index"
        class="tab-item"
        :class="[{ active: item.com === componentId }]"
        @click="changeTab(item)"
      >
        {{ item.name }}
      </div>
    </div>
    <!-- 1. component标签是vue内置的 作用:组件的占位符 -->
    <!-- 2. is属性的值,表示要渲染的组件的名字(组件在components节点下的注册名称) -->
    <!-- 使用keep-alive 把组件进行缓存,而不是销毁组件 -->
    <keep-alive>
      <component :is="componentId" />
    </keep-alive>
  </div>
</template>

vue3 写法
在vue3中我们会尝试这么写:
<script setup>
import { markRaw, reactive, shallowRef } from 'vue'
import A from './z-a.vue'
import B from './z-b.vue'
import C from './z-c.vue'


const componentId = ref(A)

const tabList = reactive([
  {
    name: 'A组件',
    com: A
  },
  {
    name: 'B组件',
    com: B
  },
  {
    name: 'C组件',
    com: C
  }
])

function changeTab(item) {
  componentId.value = item.com
}
</script>

<template>
  <div>
    <div style="display: flex">
      <div
        v-for="(item, index) in tabList" :key="index"
        class="tab-item"
        :class="[{ active: item.com === componentId }]"
        @click="changeTab(item)"
      >
        {{ item.name }}
      </div>
    </div>
    <component :is="componentId" />
  </div>
</template>

<style scoped>
.tab-item {
  border: solid 1px #ccc;
  padding: 5px 10px;
  margin: 5px;
  cursor: pointer;
}
.active {
  background-color: cornflowerblue;
}
</style>
在Vue2 的时候 is 是通过组件名称切换的, 在Vue3 setup 是通过组件实例切换的,这么写控制台会给出警告:
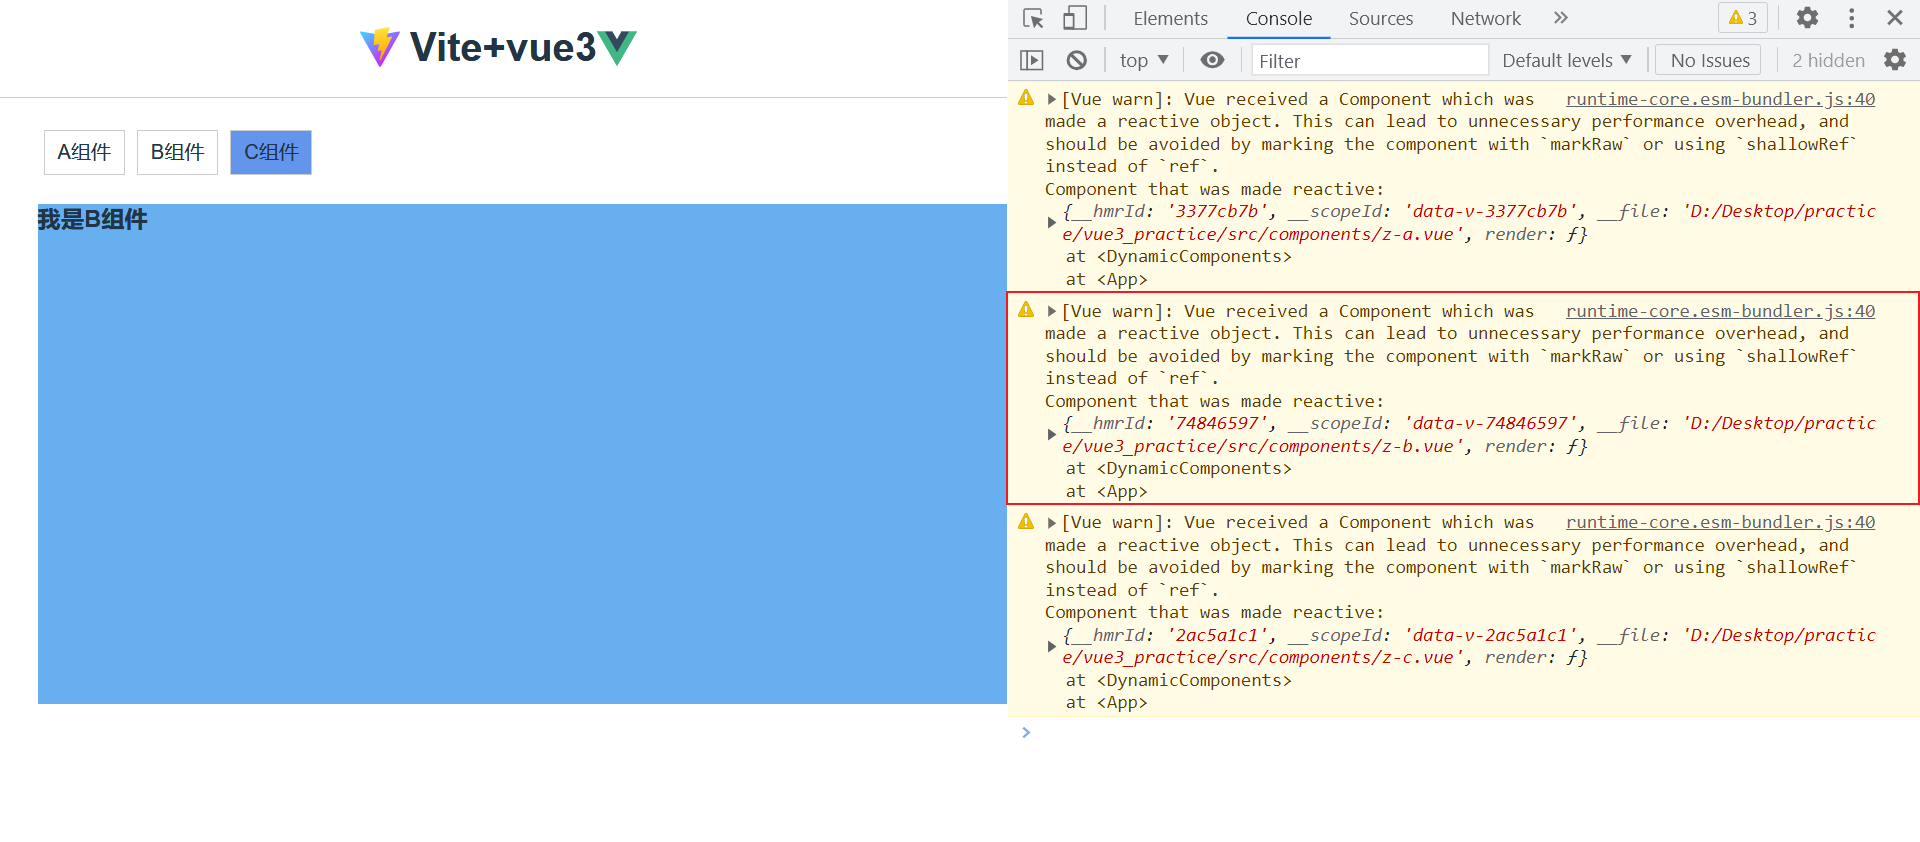
这是因为
reactive会进行proxy代理,而我们组件代理之后毫无用处,为了节省性能开销,vue推荐我们使shallowRef或者markRaw跳过proxy代理来标记组件或使用。
<script setup>
import { markRaw, reactive, shallowRef } from 'vue'
import A from './z-a.vue'
import B from './z-b.vue'
import C from './z-c.vue'


// 这里也需要使用 shallowRef 去指定默认的
const componentId = shallowRef(A)

const tabList = reactive([
  {
    name: 'A组件',
    // vue源码中,使用markRaw时,会给这个对象加一个 __slip__属性,reactive如果碰到这个属性,会跳过 proxy 代理
    com: markRaw(A)
  },
  {
    name: 'B组件',
    // 也可以使用 shallowRef 不进行对象的响应式处理
    com: shallowRef(B)
  },
  {
    name: 'C组件',
    com: markRaw(C)
  }
])

function changeTab(item) {
  componentId.value = item.com
}
</script>
组合式写法
当然你也可以使用双 script 的方式来使用动态组件 (组合式和响应式api结合):
<script setup>
import { reactive, ref } from 'vue'
import A from './z-a.vue'
import B from './z-b.vue'
import C from './z-c.vue'


const componentId = ref('A')

const tabList = reactive([
  { name: 'A组件', com: 'A' },
  { name: 'B组件', com: 'B' },
  { name: 'C组件', com: 'C' }
])

function changeTab(item) {
  componentId.value = item.com
}
</script>

<script>
// 使用vue2 的方式导入组件
export default {
  components: { A, B, C }
}
</script>
slot 插槽
💭
插槽就是子组件中的提供给父组件使用的一个占位符,用 表示,父组件可以在这个占位符中填充任何模板代码,如 HTML、组件等,填充的内容会替换子组件的标签。
匿名插槽
- 定义一个子组件
<template>
  <div>
    <h3> 我是子组件 </h3>
    <slot />
  </div>
</template>
- 父组件使用,给子组件填充内容
<template>
  <Children>
    <!--   template写法使用插槽,在编译时会忽略这个标签   -->
    <template #default>
      <div>我是插槽内容!</div>
    </template>
  </Children>
</template>

/*  直接填充插槽写法
    <Children>
      <div>我是插槽内容!</div>
    </Children>
*/
具名插槽
💭
具名插槽其实就是给插槽取个名字。一个子组件可以放多个插槽,而且可以放在不同的地方,而父组件填充内容时,可以根据这个名字把内容填充到对应插槽中。
<div>
  <slot name="header"></slot>
  <slot></slot>
  <slot name="footer"></slot>
</div>
父组件使用:
<template>
  <Children>
    <template #header>
      <div>我是头部插槽</div>
    </template>
    <template #default>
      <div>我是默认插槽</div>
    </template>
    <template #footer>
      <div>我是底部插槽</div>
    </template>
  </Children>
</template>
简写方式:
<template>
  <Children>
    <!--  header不传将会展示子组件内定义的默认样式  -->
    <template #header>
      <div>我是头部插槽</div>
    </template>
    <template #default>
      <div>我是默认插槽</div>
    </template>
    <template #footer>
      <div>我是底部插槽</div>
    </template>
  </Children>
</template>
作用域插槽
在子组件动态绑定参数,派发给父组件的slot去使用。
<script setup lang="ts">
import { reactive } from 'vue'

interface names {
  name: string
  age: number
}
const data = reactive<names[]>([
  { name: 'liaoyi', age: 22 },
  { name: '李欣', age: 24 },
  { name: '夏琪', age: 20 },
  { name: '张三', age: 26 }
])
</script>

<template>
  <div class="child">
    <slot name="header" />
    <div v-for="(item, index) in data" :key="index">
      <slot :data="item" />
    </div>
    <slot name="footer" />
  </div>
</template>
父组件通过ES6解构方式获取值:
<template>
  <Children>
    <template #header>
      <div>我是头部插槽</div>
    </template>
    <template #default="{ data, index }">
      <div>{{ index }} -- {{ data.name }} -- {{ data.age }}</div>
    </template>
    <template #footer>
      <div>我是底部插槽</div>
    </template>
  </Children>
</template>
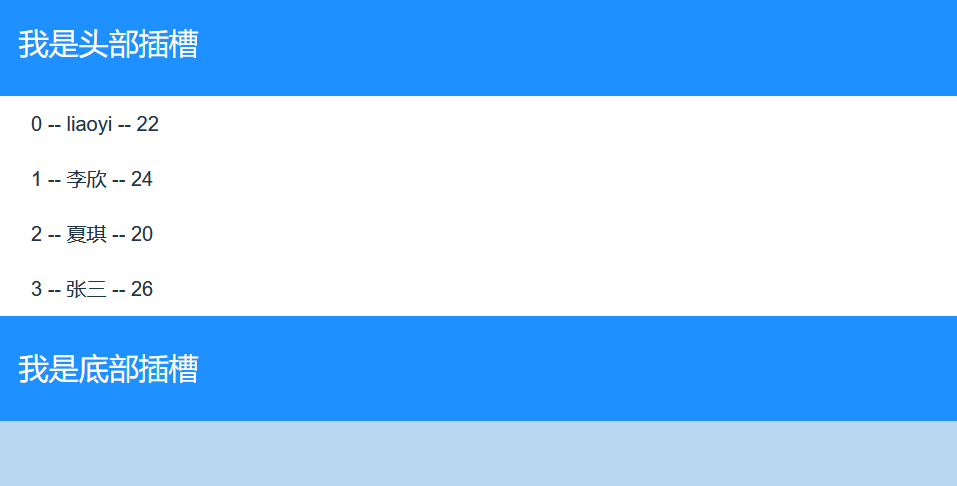
动态插槽
插槽可以是一个变量名
<script setup>
import { ref } from 'vue'

const slotName = ref('header')
</script>

<template>
  <Children>
    <template #[name]>
      <div> 动态插槽 </div>
    </template>
  </Children>
  <button @click="slotName = 'default'">
    修改插槽
  </button>
</template>
keep-alive 缓存组件
💭
有时候我们不希望组件被重新渲染影响使用体验 (比如切换多个表单组件时不想表单被清空), 或者处于性能考虑,避免多次重复渲染降低性能。而是希望组件可以缓存下来,维持当前的状态。这时候就需要用到keep-alive组件。
开启 keep-alive 后会新增两个生命周期,onActivated 和 onDeactivated。 下面是生命周期变化:
- 初次进入时: 先触发
onMounted然后触发onActivated - 退出后触发
onDeactivated - 再次进入:只会触发
onActivated
💭
所以我们可以从上总结出,如果一些组件中定义的方法,只想执行一次,就放在 onMounted 中,如果组件每次进入后都要执行的方法就放在 onActivated 中。
基本使用
<!-- 基本 -->
<keep-alive>
  <component :is="view"></component>
</keep-alive>

<!-- 多个条件判断的子组件 -->
<keep-alive>
  <comp-a v-if="a > 1"></comp-a>
  <comp-b v-else></comp-b>
</keep-alive>

<!-- 和 `<transition>` 一起使用 -->
<transition>
  <keep-alive>
    <component :is="view"></component>
  </keep-alive>
</transition>
include 和 exclude
include和exclude允许组件有条件地缓存。二者都可以用逗号分隔字符串、正则表达式或一个数组来表示。
<!-- 注意在 setup语法糖中,组件name 默认为组件文件名  -->
// include 定义需要缓存的组件
<keep-alive :include="['compA','compB']">
   <compA />
   <compB />
</keep-alive>

// exclude: 定义不缓存的组件
<keep-alive :exclude="['compA']">
   <compA />
   <compB />
</keep-alive>

// max: 指定缓存组件的最大数量 (比如有11个组件,只想缓存9个) 会优先缓存活跃组件
<keep-alive :max="10">
  <component :is="view"></component>
</keep-alive>
自定义hook函数
- 什么是hook?—— 本质是一个函数,把setup函数中使用的
Composition API进行了封装。 - 类似于
vue2.x中的mixin。 - 自定义
hook的优势: 复用代码, 让setup中的逻辑更清楚易懂。
其它 Composition API
vue3 到底给我们提供了多少 API 呢,我们可以在main.js中输出一下:
import * as Vue from 'vue';
console.dir(Vue);
控制台输出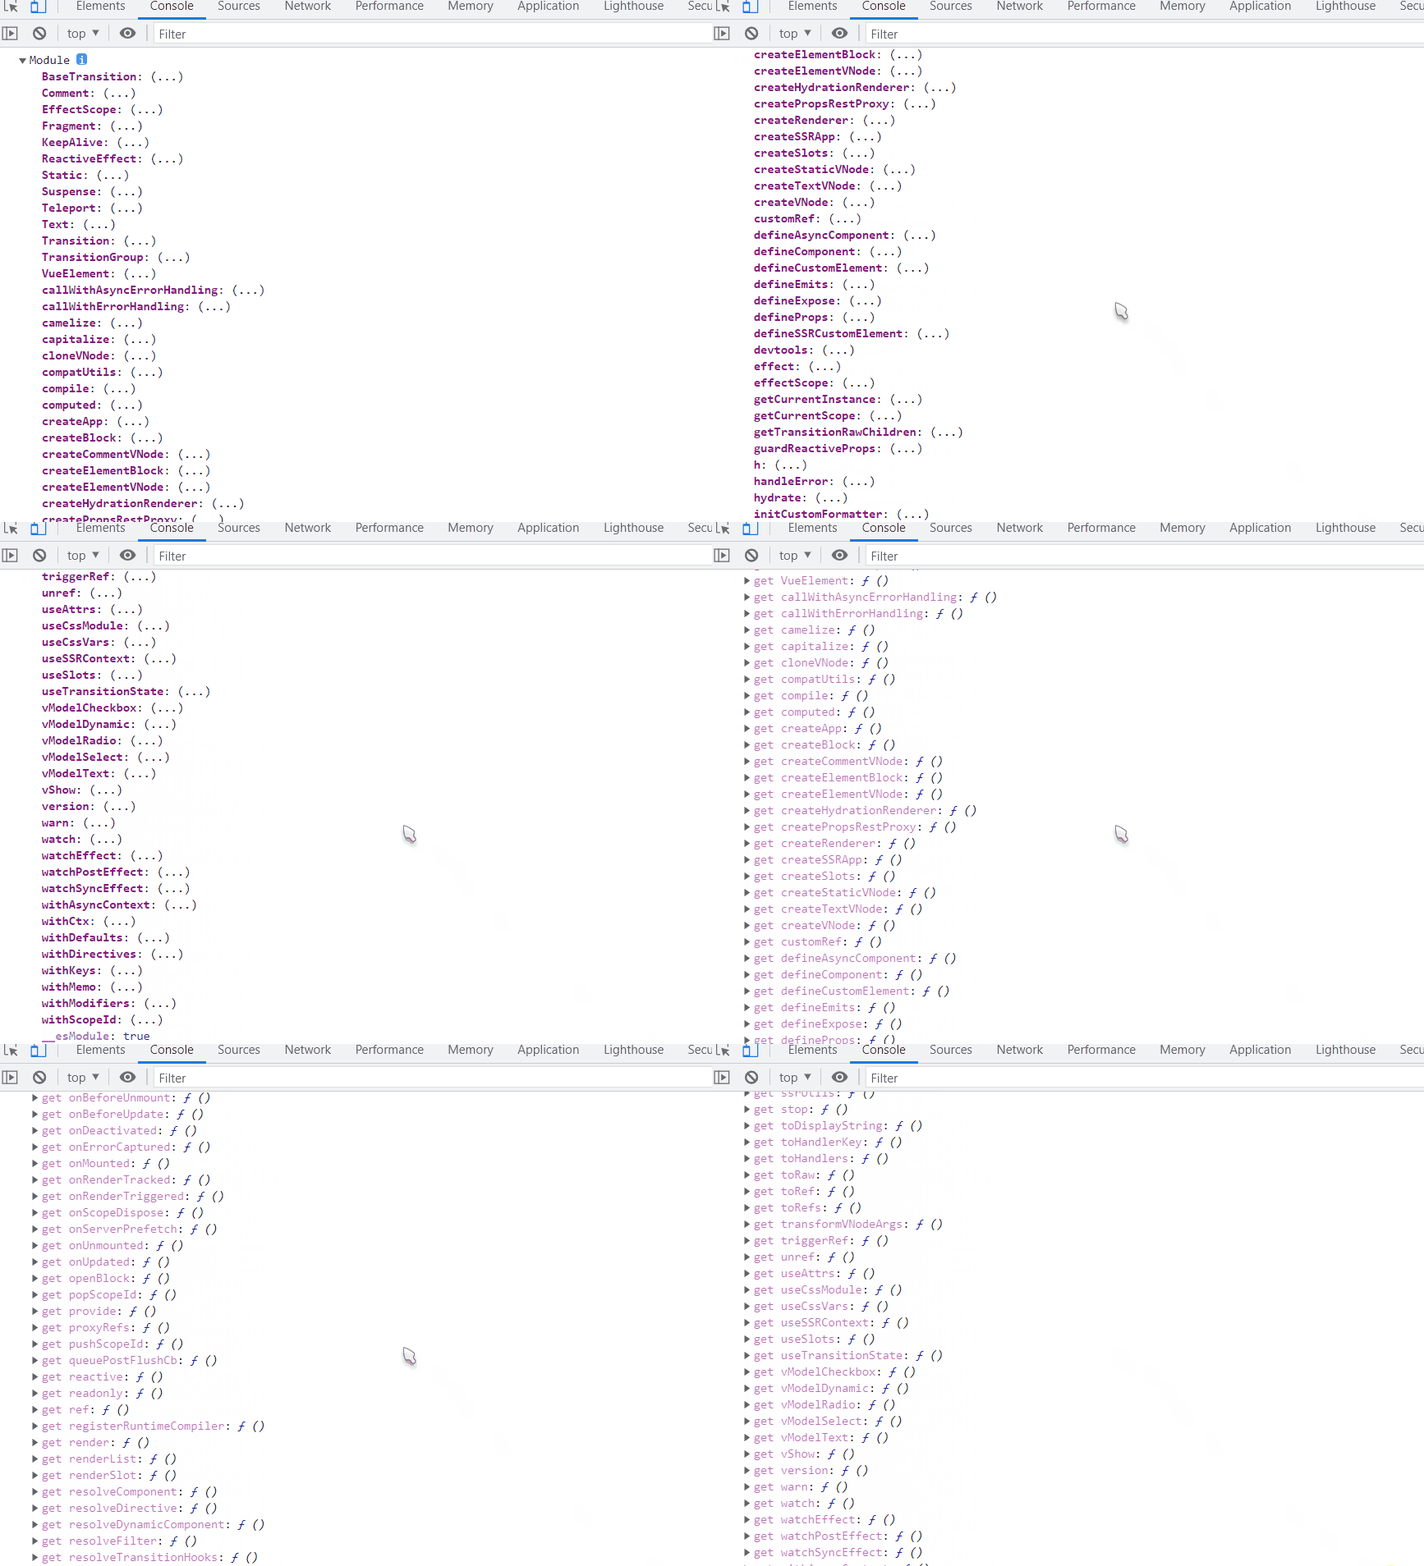
ref 其它 api
isRef
isRef: 用与判断是不是一个ref对象, vue源码中用的比较多。
import { ref,isRef } from 'vue'
let message: Ref<string | number> = ref("我是message")
let notRef:number = 123
const changeMsg = () => {
  message.value = "change msg"
  console.log(isRef(message)); //true
  console.log(isRef(notRef)); //false
}
shallowRef
shallowRef:只处理基本数据类型的响应式, 不进行对象的响应式处理。
<template>
  <div>
    <button @click="changeRef">改变ref</button>
    <button @click="changeShallowRef">改变shallowRef</button>
    <div>ref: {{ refObj.name }}</div>
    <hr>
    <div>shallowRef: {{ shallowRefObj.name }}</div>
  </div>
</template>

<script setup>
import { ref, shallowRef } from 'vue'
// ref 深层次响应数据  shallowRef 浅层次响应数据
let refObj = shallowRef({
  name: "liaoyi"
})
// 创建一个跟踪自身 .value 变化的 ref,但不会使其值也变成响应式的
let shallowRefObj = shallowRef({
  name: "liaoyi"
})

const changeRef = () => {
  refObj.value.name = '王二狗'
}

const changeShallowRef = () => {
  // 因为其属性是非响应式,虽然数据变了但是页面不会更新
  shallowRefObj.value.name = '张全蛋'
  // 我们可以给shallowRefMessage对象直接复赋值
  shallowRefObj.value = { name: '李四' }
}

// 下面这种写法是错误的
//  ref 和 shallowRef 不能一起使用,会影响shallowRef 造成视图更新
const changeMsg = () => {
	refObj.value.name = '王二狗'
  shallowRefMessage.value = '我被影响了,导致视图更新!'
}
</script>
triggerRef
triggerRef: 用于强制更新页面DOM。
上面的代码里,我们在一个方法中同时修改ref和 shallowRef 值,出现了影响 shallowRef 造成视图更新的现象,那这个问题是如何产生的呢 ?这时候我们就可以介绍 triggerRef 。因为使用 ref 更改值的时候,ref 底层中会调用一次 triggerRef 方法,所以才会影响 shallowRef 造成视图更新。为了更好的理解,你也可以把ref想象成 shallowRef + triggerRef 结合。
<template>
  <div>
    <button @click="changeMsg">change</button>
    <div>{{ message }}</div>
  </div>
</template>


<script setup>
import { Ref, shallowRef,triggerRef } from 'vue'

let message = shallowRef({
  name: "小满"
})

const changeMsg = () => {
  message.value.name = '大满'
  triggerRef(message)
}
</script>


<style>
</style>
customRef
作用:用于创建一个自定义的 ref,并对其依赖项跟踪和更新触发进行显式控制。
如实现防抖效果:
<!-- 简单理解: customRef 是个工厂函数  -->
<!-- 要求我们返回一个对象 并且实现 get 和 set  适合去做防抖之类的 -->
<script setup>
import { customRef, ref } from 'vue'

// let keyword = ref('hello') //使用Vue准备好的内置ref
//自定义一个myRef
function myRef(value, delay) {
  let timer
  /**
 		* 通过customRef去实现自定义
 		* @param { callback } track - 用于收集依赖
 		* @param { callback } trigger - 用于处理依赖
 		*/
  return customRef((track, trigger)=>{
    return {
      get() {
        track() //告诉Vue这个value值是需要被“追踪”的
        return value
      },
      set(newValue) {
        clearTimeout(timer)
        timer = setTimeout(()=>{
          value = newValue
          trigger() //告诉Vue去更新界面
        }, delay)
      }
    }
  })
}
const keyword = myRef('hello', 500) //使用程序员自定义的ref
</script>

<template>
  <input v-model="keyword" type="text">
  <h3>{{ keyword }}</h3>
</template>
reactive 其它api
shallowReactive
shallowReactive:只处理对象最外层属性的响应式(浅响应式)。
<script setup lang="ts">
import { shallowReactive } from 'vue'

const obj = {
  a: 1,
  first: {
    b: 2,
    second: {
      c: 3
    }
  }
}

const state = shallowReactive(obj)

function change1() {
  // 虽然 state.a 值改变了,但视图不会更新
  state.a = 7
}
function change2() {
  // 只能到获取到对象的第一层数据
  state.first.b = 8
  state.first.second.c = 9
  console.log(state)
}
</script>

<template>
  <div>
    <div>{{ state }}</div>
    <button @click="change1">
      test1
    </button>
    <button @click="change2">
      test2
    </button>
  </div>
</template>
readonly 与 shallowReadonly
readonly: 让一个响应式数据变为只读,并且是深度只读(深只读)。
<script setup lang="ts">
import { reactive, readonly, ref, } from 'vue'

const state = reactive({
  name:'liaoyi',
  age:12,
  car:{
    name:'奔驰',
    color:'red'
  }
})
const state2 = readonly(state)
function update() {
  // 无法修改 state2为只读
  state2.name += '---'
  state2.car.name += '---'
}
</script>

<template>
  <h2>readonly</h2>
  <h3> {{ state }}</h3>
  <button @click="update">
    更新数据
  </button>
</template>
shallowReadonly:让一个响应式数据变成浅层的属性为只读,深层次属性可以修改(浅只读)。
<script setup lang="ts">
import { reactive, readonly, ref, } from 'vue'

const state = reactive({
  name:'liaoyi',
  age:12,
  car:{
    name:'奔驰',
    color:'red'
  }
})
const state2 = shallowReadonly(state)
function update() {
	  // state2.name += '---'   无法修改浅层次值
  state2.car.name += '---'  // 深层次值可以被修改
	  console.log('数据变化了~')
}
</script>
💭
应用场景:不希望数据被修改时。
什么时候使用 shallowReactive 与 shallowRef ?
💭
- 如果有一个对象数据,结构比较深, 但变化时只是外层属性变化 ===> shallowReactive。
- 如果有一个对象数据,后续功能不会修改该对象中的属性,而是生新的对象来替换 ===> shallowRef。
toRef 与 toRefs
toRef
toRef 只能用于响应式数据,非响应式数据使用时视图不会有变化 (毫无卵用)。 使用: 接收两个参数:第一个参数是响应式对象,第二个参数为对象的key。 类似于vue2中的$set。
<script setup lang="ts">
import { reactive, toRef } from 'vue'

const obj = { foo: 1, bar: 1 }

// bar 转化为响应式对象
const state = toRef(obj, 'bar')

const main = reactive({ name: 'liaoyi', like: 'Code' })
const like =  toRef(obj, 'like')

function change() {
  // 数据虽然发生变化,但是视图不会更新
  state.value ++
  console.log(obj, state)
}

function changeState() {
  like.value  = 'reap'
  console.log(like)
}
</script>

<template>
  <div>
    <button @click="change">
      非响应式数据使用toRef后修改值
    </button>
    <button @click="changeState">
      响应式数据使用toRef后修改值
    </button>
    {{ state }}
  </div>
</template>
toRefs
前面我们其实使用过toRefs,它批量创建ref对象,方便我们解构使用。
import { reactive, toRefs } from 'vue'

const obj = reactive({
  foo: 1,
  bar: 1
})

const { foo, bar } = toRefs(obj)

foo.value++
console.log(foo, bar)
toRaw 与 markRaw
toRaw
- 作用:将一个由
reactive生成的 响应式对象 转为 普通对象。 - 使用场景:用于读取响应式对象对应的普通对象,对这个普通对象的所有操作,不会引起页面更新。
import { reactive, toRaw } from 'vue'

const obj = reactive({
  foo: 1,
  bar: 1
})

const state = toRaw(obj)
// 响应式对象转化为普通对象

function change() {
  console.log(obj, state)
}
markRaw
**markRaw**: 用于标记一个对象,使其永远不会再成为响应式对象。 **应用场景: **
- 有些值不应被设置为响应式的,例如复杂的第三方类库等。
- 当渲染具有不可变数据源的大列表时,跳过响应式转换可以提高性能。
响应式数据的判断
isRef: 检查一个值是否为一个 ref 对象 isReactive: 检查一个对象是否是由 reactive 创建的响应式代理 isReadonly: 检查一个对象是否是由 readonly 创建的只读代理 isProxy: 检查一个对象是否是由 reactive 或者 readonly 方法创建的代理
vuex 使用
vue3中使用的是vuex4版本,我们不在使用import方式导入vuex,而是使用官方提供的函数式api方式使用。参考链接:vuex4.x 官网
- 在项目根目录 新建
store/index.js文件:
import { createStore, createLogger } from 'vuex';
const env = process.env.NODE_ENV; // 开发环境变量
const store = createStore({
    state: { x: 0, y: 10 },
    mutations: {
        changeX(state, payload = 1) {
            state.x += +payload;
        },
        changeY(state, payload = 1) {
            state.y -= +payload;
        }
    },
    actions: {
        changeYAsync({ commit }, payload) {
            setTimeout(() => {
                commit('changeY', payload);
            }, 1000);
        }
    },
   // 开发环境开启Logger调试
    plugins: env === "production" ? [] : [createLogger()]
});
export default store
💭
createLogger 是vuex内置的插件,方便我们在开发时使用vuex时控制台返回日志输出,如果你不了解vuex内置插件 Vuex 内置 Logger 插件。
- 在
main.j文件上导入store:
import { createApp } from 'vue';
import App from './App.vue';
import store from './store/index';

const app = createApp(App);
app.use(store);
app.mount('#app');
- 在组件中使用
<template>
  测试Vuex公共状态管理
  x:{{ x }}
  y:{{ y }}
  <button @click="setX(10)">改变X</button>
  <button @click="setY(2)">改变Y</button>
</template>

<script>
import { computed, ref, reactive } from "vue"
import { useStore } from "vuex"

export default {
  name: "Test",
  setup() {
    const store = useStore();
    let x = computed(() => store.state.x)
    let y = computed(() => store.state.y)

    const setX = (val) => {
      store.commit("changeX", val)
    }
    const setY = (val) => {
      store.dispatch("changeYAsync", val)
    }

    return { x,  y, setX, setY };
  },
};
</script>
注意:在vue3中的setup中无法通过辅助函数的方式操作store。
Router 使用
- 在根目录新建
router/index.js文件写入:
import { createRouter, createWebHashHistory } from "vue-router";
import Vote from "@/pages/Vote.vue";
import Test from "@/pages/Test.vue";

const routes = [{
    path: '/',
    component: Vote,
}, {
    path: '/test',
    component: Test,
}, {
    path: '/:pathMatch(.*)*',
    redirect: '/'
}]

const router = createRouter({
    history: createWebHashHistory(),
    routes
})
export default router;
- 在main.js 导入
import { createApp } from 'vue';
import App from './App.vue';
import router from "./router/index";

const app = createApp(App);
app.use(router);
app.mount('#app');
其他改变
全局API的转移
Vue 2.x 有许多全局 API 和配置, 例如:注册全局组件、注册全局指令等。
//注册全局组件
Vue.component('MyButton', {
  data: () => ({
    count: 0
  }),
  template: '<button @click="count++">Clicked {{ count }} times.</button>'
})

//注册全局指令
Vue.directive('focus', {
  inserted: el => el.focus()
}
💭
Vue3.0 中对这些API做出了调整, 将全局的 API,即:Vue.xxx调整到应用实例(app)上。
| 2.x 全局 API(Vue) | 3.x 实例 API (app) |
|---|---|
| Vue.config.xxxx | app.config.xxxx |
| Vue.config.productionTip | 移除 |
| Vue.component | app.component |
| Vue.directive | app.directive |
| Vue.mixin | app.mixin |
| Vue.use | app.use |
| Vue.prototype | app.config.globalProperties |
globalProperties
💭
由于Vue3 没有 Prototype 属性,需要使用 app.config.globalProperties ,去定义变量和函数。
// Vue 2
// Vue.prototype.$http = () => {}

// Vue 3
import { createApp } from 'vue'
import App from './App.vue'

const app =  createApp(App)
app.mount('#app')

// 定义全局变量
app.config.globalProperties.$env = 'dev'
// 定义全局方法
app.config.globalProperties.$http = () => {}

// vue3已经移除了过滤器 我们可以使用全局函数代替 filters
app.config.globalProperties.$filters = {
  format<T extends any>(str: T): string {
    return `filters-${str}`
  }
}
在页面中使用:
<template>
	<!-- 在template中可以直接使用 -->
  <div> {{ $env }}</div>
  <div> {{ $filters.format('Hello') }}</div>
</template>

<script setup lang="ts">
  // 在js里使用 全局变量和方法有两种方式

  // 第一种:引入 getCurrentInstance 用于获取当前实例
  import { getCurrentInstance } from 'vue';

  const app = getCurrentInstance()
  console.log(app?.proxy?.$filters.format('typescript'))
  console.log(app?.proxy?.$env)

  // 第二种:引入 ComponentInternalInstance
  import { ComponentInternalInstance } from 'vue';
  const { appContext } = <ComponentInternalInstance>getCurrentInstance()
  console.log(appContext.config.globalProperties.$env)

</script>
这里如果使用 typescript 的话,因为没有声明文件 ,TS无法正确类型,推导时会报错:
// <!-- 我们在main.ts中自己手动加入声明文件 -->
interface Filter {
  format<T>(str: T): string
}

// 声明要扩充@vue/runtime-core包的声明.
// 这里扩充"ComponentCustomProperties"接口, 因为他是vue3中实例的属性的类型.
declare module 'vue' {
  export interface ComponentCustomProperties {
    $filters: Filter
  }
}
其他改变
data选项应始终被声明为一个函数。- 过度类名的更改:
.v-enter,
.v-leave-to {
  opacity: 0;
}
.v-leave,
.v-enter-to {
  opacity: 1;
}
Vue3.x写法
.v-enter-from,
.v-leave-to {
  opacity: 0;
}

.v-leave-from,
.v-enter-to {
  opacity: 1;
}
- 移除
keyCode作为v-on的修饰符,同时也不再支持config.keyCodes - 移除
v-on.native修饰符
<my-component
  v-on:close="handleComponentEvent"
  v-on:click="handleNativeClickEvent"
/>
<script>
export default {
  emits: ['close']
}
</script>
移除过滤器(filter)
💭
过滤器虽然这看起来很方便,但它需要一个自定义语法,打破大括号内表达式是 “只是 JavaScript” 的假设,这不仅有学习成本,而且有实现成本!建议用方法调用或计算属性去替换过滤器。
vueUse
useCssVar
const el = ref(null);
const cssVar = useCssVar('--el-color-primary', el);

// 等同于
const el = document.documentElement;
getComputedStyle(el).getPropertyValue('--el-color-primary')

/**
  1. 当属性--primary不存在时 默认 #d060d0
  2. 设置属性: document.getElementById('app').style.setProperty('--primary', 'red');
  2. 获取属性: document.getElementById('app').style.getPropertyValue('--primary')
  3. 通过以上方法设置主题
 */
$primary: var(--el-color-primary);
节流
const debouncedFn = useDebounceFn((entries) => {
  const entry = entries[0];
  const { width } = entry.contentRect;
  console.log('output=>', width);
}, 1000);

useResizeObserver(app, debouncedFn);
源码解析
toRef
如果是 ref 对象直接返回 否则 调用 ObjectRefImpl 创建一个类ref对象
export function toRef<T extends object, K extends keyof T>(
  object: T,
  key: K,
  defaultValue?: T[K]
): ToRef<T[K]> {
  const val = object[key]
  return isRef(val)
    ? val
    : (new ObjectRefImpl(object, key, defaultValue) as any)
}
类 ref 对象只是做了值的改变并未处理 收集依赖和触发依赖的过程 所以 普通对象无法更新视图
class ObjectRefImpl<T extends object, K extends keyof T> {
  public readonly __v_isRef = true

  constructor(
    private readonly _object: T,
    private readonly _key: K,
    private readonly _defaultValue?: T[K]
  ) {}

  get value() {
    const val = this._object[this._key]
    return val === undefined ? (this._defaultValue as T[K]) : val
  }

  set value(newVal) {
    this._object[this._key] = newVal
  }
}
keep-alive 源码
💭
- 源码目录 runtime-core/src/components/KeepAlive.ts
props
props: {
  // 配置了该属性,那么只有名称匹配的组件会被缓存
  include: [String, RegExp, Array],
    // 配置了该属性,那么任何名称匹配的组件都不会被缓存
    exclude: [String, RegExp, Array],
    // 最多可以缓存多少组件实例
    max: [String, Number]
},

setup(props: KeepAliveProps, { slots }: SetupContext) {
  const instance = getCurrentInstance()!
  const sharedContext = instance.ctx as KeepAliveContext
})
const { include, exclude, max } = props
//如果include 子组件名称 不包含, 和  exclude包含的名字 就不该缓存 直接返回
if (
  (include && (!name || !matches(include, name))) ||
  (exclude && name && matches(exclude, name))
) {
  current = vnode
  return rawVNode
}
watch(
  () => [props.include, props.exclude],
  ([include, exclude]) => {
    //props 是响应式的 所以这个操作需要在做一遍
    include && pruneCache(name => matches(include, name))
    exclude && pruneCache(name => !matches(exclude, name))
  },
  // prune post-render after `current` has been updated
  { flush: 'post', deep: true }
)
缓存设计
//KeepAlive 组件的缓存管理
const cache: Cache = new Map()
const keys: Keys = new Set()
let pendingCacheKey: CacheKey | null = null
//缓存函数
const cacheSubtree = () => {
  // fix #1621, the pendingCacheKey could be 0
  if (pendingCacheKey != null) {
    cache.set(pendingCacheKey, getInnerChild(instance.subTree))
  }
}

//KeepLive 组件中对缓存的管理时,首先会在组件的 onMounted 或 onUpdated 生命周期钩子函数中设置缓存,如下代码所示:
onMounted(cacheSubtree)
onUpdated(cacheSubtree)
//Vnode 的key 作为缓存的key
pendingCacheKey = key
//KeepLive组件返回的函数中根据 vnode 对象的 key 去缓存中查找是否有缓存的组件,
//如果缓存存在,则继承组件实例,并将用于描述组件的 vnode 对象标记为 COMPONENT_KEPT_ALIVE,
//这样渲染器就不会重新创建新的组件实例;如果缓存不存在,则将 vnode 对象的key 添加到 keys 集合中
if (cachedVNode) {
  // 如果缓存中存在缓存的组件,直接读取缓存实例
  vnode.el = cachedVNode.el
  vnode.component = cachedVNode.component
  //无须创建组件实例,继承缓存的组件即可
  if (vnode.transition) {
    // 如果组件上有动画,处理动画
    setTransitionHooks(vnode, vnode.transition!)
  }
  // 标记Vnode 不会重新渲染
  vnode.shapeFlag |= ShapeFlags.COMPONENT_KEPT_ALIVE
  // make this key the freshest
  keys.delete(key)
  keys.add(key)
} else {
  //将 vnode 的key 添加到 keys 集合中,keys 集合用户维护缓存组件的 key
  keys.add(key)
  // prune oldest entry
  if (max && keys.size > parseInt(max as string, 10)) {
    pruneCacheEntry(keys.values().next().value)
  }
}
生命周期
//隐藏容器
const storageContainer = createElement('div')
//在实例上注册两个钩子函数 activate,  deactivate
sharedContext.activate = (vnode, container, anchor, isSVG, optimized) => {
  const instance = vnode.component!
  move(vnode, container, anchor, MoveType.ENTER, parentSuspense)
  // props 可能会发生变化,因此需要执行 patch 过程
  patch(
    instance.vnode,
    vnode,
    container,
    anchor,
    instance,
    parentSuspense,
    isSVG,
    vnode.slotScopeIds,
    optimized
  )
  queuePostRenderEffect(() => {
    instance.isDeactivated = false
    if (instance.a) {
      invokeArrayFns(instance.a)
    }
    const vnodeHook = vnode.props && vnode.props.onVnodeMounted
    if (vnodeHook) {
      invokeVNodeHook(vnodeHook, instance.parent, vnode)
    }
  }, parentSuspense)
  if (__DEV__ || __FEATURE_PROD_DEVTOOLS__) {
    // Update components tree
    devtoolsComponentAdded(instance)
  }
}
sharedContext.deactivate = (vnode: VNode) => {
  const instance = vnode.component!
  //将组件移动到隐藏容器中
  //在 “卸载” 组件时,并不是真正的卸载,而是调用 move 方法,将组件搬运到一个隐藏的容器中
  move(vnode, storageContainer, null, MoveType.LEAVE, parentSuspense)
  queuePostRenderEffect(() => {
    if (instance.da) {
      invokeArrayFns(instance.da)
    }
    const vnodeHook = vnode.props && vnode.props.onVnodeUnmounted
    if (vnodeHook) {
      invokeVNodeHook(vnodeHook, instance.parent, vnode)
    }
    instance.isDeactivated = true
  }, parentSuspense)
  if (__DEV__ || __FEATURE_PROD_DEVTOOLS__) {
    // Update components tree
    devtoolsComponentAdded(instance)
  }
}